
TL;DR

Get baking supplies delivered free with Prime
- Fast, free delivery on millions of items
- Prime Video, Amazon Music and more included
- Member-only deals all year
Choux pastry is a cooked dough that rises when water in the dough turns to steam, creating a hollow center for filling. Cook the flour mixture until it forms a smooth mass, add eggs gradually until the dough falls from a spatula in a thick V, then pipe evenly and bake until the shells feel dry. Éclairs and cream puffs share this method but differ in shape and finish.
Éclairs and cream puffs start with dough cooked in a saucepan, which sounds like a small kitchen plot twist. That early cooking is what makes choux pastry different from many other pastries: moisture in the dough becomes steam in the oven, and the expanding steam creates a hollow center for filling.
Once you understand the method, you can see the shared foundation behind a crisp éclair and a round cream puff. You’ll learn what each stage does, how to judge the dough by sight and feel, and why a shell that looks ready may still need more time in the oven. It’s a little like inflating a small balloon and then giving its walls time to set.
The practical details matter. Add eggs gradually, pipe consistent shapes, and let the shells dry fully before they cool. Those habits help whether you’re making a tray of profiteroles for a weekend dessert or baking éclairs ahead for a family gathering.
Choux pastry rises mainly when moisture turns to steam in the oven; it does not rely on baking powder or yeast.
Cook the flour mixture until it forms a smooth ball and leaves a light film on the pan.
Add egg gradually and stop when glossy dough falls from a spatula in a thick V.
Pipe consistent rounds or strips, then bake until shells are browned, firm, and dry inside.
Cool shells fully before airtight storage, and fill close to serving to help them stay crisp.
A pastry method, decoded
The Choux Pastry Method Behind Éclairs and Cream Puffs
One cooked dough. Two iconic shapes. Steam creates the lift while starch and egg proteins set a crisp shell around the hollow center.
Why choux puffs without baking powder
Choux pastry—pâte à choux in French—is a steam-leavened dough. Water in the dough turns to steam in the hot oven and pushes the soft walls outward. The starch and egg proteins then set around the expanding pocket, leaving a hollow shell. Eggs help the dough stretch and hold its structure; steam provides much of the initial expansion.
Moisture becomes steam
Expanding steam inflates the dough. There is no need for yeast or baking powder to create the main rise.
Starch and eggs set
Cooked starch gives the dough body. Egg proteins help the walls set as the shell bakes.
Dry shells stay up
A browned, firm shell needs to dry inside. If it stays damp, it can sag as it cools.
Four cues from saucepan to cooling rack
Each stage prepares the dough for the next. Follow one tested recipe for proportions, oven settings, and timing; those details vary.
Cook to a smooth mass
Boil liquid and butter, add flour all at once, and stir until a ball forms with a light film on the pan.
Cool slightly
Let the cooked dough become warm, so the eggs can be mixed in without scrambling.
Add egg in stages
Mix in small portions. Stop when glossy dough falls from the spatula in a thick V.
Pipe, bake, dry
Shape evenly and bake until browned, firm, and dry inside. Cool fully before filling.
Let texture—not the last drop—make the call
Éclairs and cream puffs share the method
Consistent sizing helps every pastry on the tray bake at roughly the same rate. Leave space for hot air to circulate, and smooth a pointed puff peak with a damp fingertip.
| Pastry | Shape | Common finish | Filling access |
|---|---|---|---|
| Éclair | Long strip | Pastry cream; icing or glaze | Filled lengthwise |
| Cream puff | Round mound | Pastry cream or whipped cream | Split or filled through a small opening |
Wait for a dry shell, not just a puffed one
A shell can look impressively risen before its center has dried. Follow your recipe’s oven temperature and timing, avoid opening the door early while the structure sets, and bake until the shells are well browned and feel firm.
Browned exterior · firm feel · dry interior. Let shells cool completely before storing airtight.
Fill close to serving time: moist fillings soften crisp shells. Refresh baked shells briefly in the oven if needed.
From cooked paste to filled pastry
Flour hydrates
Hot liquid, butter, and flour form a cohesive mass.
Egg adds flex
Gradual additions make the dough glossy and pipeable.
Round or strip
Pipe even cream puffs or éclair lengths.
Steam expands
Heat creates the hollow center as walls rise.
Dry, cool, fill
Structure firms up; filling brings the finish.
Why cooked choux dough puffs without baking powder
Choux pastry is a cooked dough that rises mainly because water in it turns to steam in the oven. That steam expands the dough and pushes its soft walls outward, creating an airy shell with a hollow center. The pastry’s starch and egg proteins then set around the expanding pocket, helping it hold its shape as it bakes.
This unusual method means you cook the flour before the dough goes into the oven. Water or milk, butter, and often a little salt or sugar come to a boil; flour goes in all at once; then you stir until the mixture gathers into a smooth ball. It can feel more like making a thick paste than mixing a typical cake batter.
Imagine a Saturday afternoon when you want cream puffs but don’t have baking powder. Choux doesn’t need it: the heat in the oven turns moisture into expanding steam. Eggs help make the dough flexible enough to stretch and later help the shell set, but they are not the main source of the initial lift.
That distinction explains why a dry, well-baked shell matters so much. Steam does the lifting, and the dough’s structure has to hold on to that lift. If the inside stays damp, the pastry can sag like a tent with wet canvas. The next stage—cooking the flour mixture—sets up that structure.
Products Worth Considering

Le Creuset Enameled Cast Iron Round Bread Oven, 9.5-Inch, Cerise

Le Creuset Signature Enameled Cast Iron Round Dutch Oven, 5.5 qt, Deep Teal

Cuisinart 8-in-1 Air Fryer Toaster Oven with Grill, 1800W, Stainless Steel
As an affiliate, we earn on qualifying purchases.
Cook the flour mixture until it forms a smooth ball
Cook the liquid, butter, and flour until the mixture pulls together as a smooth mass and leaves a light film on the pan. This first step heats and hydrates the flour’s starch, giving the dough enough body to hold its shape when you pipe it. A glossy puddle or a loose paste needs more cooking.
Bring the recipe’s water or milk, butter, and seasonings to a boil, then add the flour in one go. Stir briskly with a sturdy spoon or spatula, scraping the bottom and sides. At first it may look lumpy; keep stirring, and it should become a cohesive ball that moves around the pan.
For example, if you lift the spoon and the dough clings in one heavy piece instead of running off, you’re closer to the right consistency. A faint film on the saucepan is another useful clue. The dough should look matte rather than wet, but avoid cooking it so long that it becomes dry and difficult to loosen with egg.
Recipes vary in whether they use water, milk, or both. Water can favor a crisper shell; milk tends to add browning and tenderness. Neither choice guarantees a result on its own, so follow one tested formula and its proportions instead of mixing instructions from different recipes. After cooking, let the dough cool slightly before adding eggs; the reason becomes clear in the next step.
Add eggs gradually and stop when the dough falls in a V
Add beaten egg a little at a time until the dough is glossy, pipeable, and falls from a spatula in a thick V. This visual check is more useful than blindly adding every drop in a recipe, because flour, cooking time, and humidity can change how much egg the dough needs. Too little egg can leave it stiff; too much can make it spread and lose its shape.
First, let the cooked flour mixture cool until it is warm rather than piping hot. Add egg in small portions, mixing each one in fully before adding more. A stand mixer can save your arm some work, but a wooden spoon and a little patience do the same job.
Picture piping a row of éclairs. If the dough breaks off the spatula in a short, rigid lump, it may be too stiff to expand well. If it pours like pancake batter, it may flatten before the shell sets. The sweet spot is shiny dough that drops slowly and leaves a thick V hanging from the spatula.
Pause to check before you use the final portion of egg; you may not need it all. In plain terms, the dough needs enough flexibility to stretch as steam inflates it, while still staying firm enough to hold a piped shape. Once it reaches that balance, you can move on to shaping the two familiar pastries.
Shape one dough into rounds or neat éclair strips
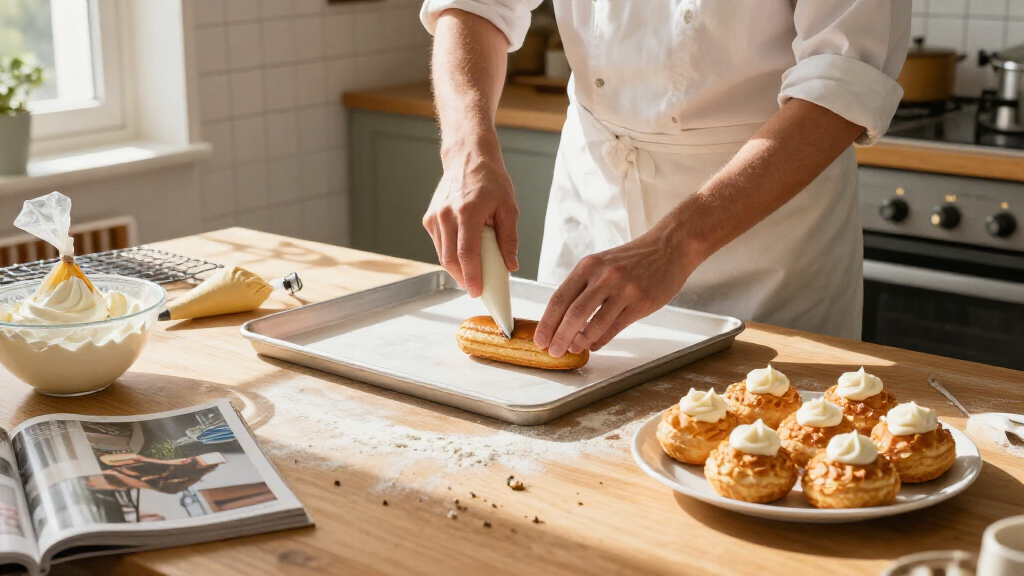
Cream puffs are piped as rounds, while éclairs are piped as long strips; both use the same choux dough. Shape affects how the pastry looks, fills, and bakes, so even sizing helps your whole tray finish at roughly the same time. A steady hand matters more than a fancy tool.
Use a piping bag and tip if you have them. For cream puffs, pipe mounds of similar size; for éclairs, aim for consistent lengths and thicknesses. A sturdy plastic bag with one corner snipped off works in a pinch, though the shape may be less even. Leave room between pieces so hot air can circulate.
Here’s a practical example: if you pipe one enormous cream puff beside several small ones, the small pastries may dry out before the large center is baked. Try to keep each piece on a tray close in size. If a pointed peak remains on a puff, gently smooth it with a damp fingertip so it doesn’t brown too quickly.
After baking, cream puffs are often split or filled through a small opening. Éclairs are typically filled lengthwise, commonly with pastry cream, then finished with icing or glaze. Whipped cream and other suitable fillings also work. The shell’s shape may change, but the oven still has the same job: expand the dough and set it before it collapses.
Bake until the shells are firm, browned, and dry inside
Bake choux shells until they are well browned and feel firm, then give them enough time to dry inside. A puffed shape alone does not prove that the center has set. If too much moisture remains, the shell may collapse as it cools, leaving you with a flat pastry instead of a crisp, hollow case.
Follow a tested recipe for its oven temperature and timing. Choux instructions differ on temperature changes, steam, and whether to vent the oven, so combining several recipes can create confusing results. Avoid opening the door early while the shells are still setting; a rush of cooler air can interrupt the rise.
Think of a cream puff that looks tall and golden after a quick peek. If it feels soft and damp rather than firm, it probably needs more baking time. The exact minutes depend on the recipe, oven, and size of the pieces, so use the shell’s color and feel alongside the clock.
Common trouble often points back to one of three things: dough that was too dry or too loose, oven heat that was too weak, or shells removed before they dried. Once cool, a shell should stay inflated and feel crisp. If you’ve made the shells ahead, you can refresh them briefly in the oven and cool them again before filling.
Choose water or milk based on the shell you want
Water can help choux shells bake up crisper, while milk tends to encourage more browning and tenderness. The choice changes the character of the pastry, but the recipe’s proportions and method also matter. It’s a useful tradeoff, not a rule that one liquid always makes better choux.
For a crisp shell you plan to fill with pastry cream, a water-based formula may suit the texture you want. If you prefer a softer bite and deeper golden color, a formula containing milk may be a better fit. Some recipes use both, balancing the two effects.
Suppose you’re making éclairs for a dessert table and want a shell that can stand up to filling. You might choose a formula known for a drier finish, then fill closer to serving time. For a small batch of cream puffs eaten soon after baking, a more tender shell may be perfectly pleasant.
These are tendencies, not guarantees: baking time, shell size, and how soon you fill the pastries all affect the final texture. Use a tested recipe as written the first time, then change one factor at a time if you want to learn how your oven and ingredients behave. That makes the result easier to read than changing the liquid, egg amount, and bake all at once.
Store shells dry and fill them close to serving time
Cool baked choux shells completely before storing them airtight, and fill them as close to serving as practical. Moist fillings gradually soften the crisp shell, while trapped steam from warm pastries can make the texture soggy even before you add anything. Dry shells give you more control over when that softening starts.
If you bake the shells in the morning for an evening gathering, let them cool fully, then store them in an airtight container. If they lose their crispness, refresh them briefly in an oven and cool them again before filling. Baked, unfilled shells can generally be frozen; thaw and re-crisp them before use.
For example, you could bake and freeze cream puff shells days ahead, then thaw and refresh them on the afternoon you plan to serve them. Fill with pastry cream, whipped cream, or another suitable filling near dessert time. Filled pastries are less convenient to freeze because some fillings change texture after thawing.
Handle fillings with ordinary food safety in mind: keep dairy-based pastry cream and whipped cream chilled, and avoid leaving filled pastries at room temperature for extended periods. If you’re serving a mixed group, flag common allergens. Choux typically contains wheat, eggs, and dairy, and fillings or toppings may add other allergens such as nuts. A small label helps guests choose comfortably.
Frequently Asked Questions
Why did my choux pastry collapse?
The shells may have been underbaked, leaving moisture inside, or the oven door may have opened before the structure set. Bake until they are well browned and feel firm and dry.
How do I know if the choux dough has enough egg?
The dough should look glossy, hold its piped shape, and fall from a spatula in a thick V. Add egg gradually; you may not need every amount listed in the recipe.
Can I make choux shells ahead of time?
Yes. Cool baked, unfilled shells completely and store them airtight. If they soften, refresh them briefly in the oven, let them cool again, and fill near serving time.
Can I freeze cream puff or éclair shells?
Baked, unfilled shells can generally be frozen. Thaw and re-crisp them in the oven before filling; freezing filled pastries can affect some fillings’ texture.
Can I use milk instead of water in choux pastry?
Many recipes use water, milk, or a mixture, but the result can differ. Water can favor a crisper shell, while milk tends to add browning and tenderness; follow a tested recipe’s proportions.
Conclusion
Remember the choux rhythm: cook the flour mixture, add eggs until the dough falls in a thick V, pipe evenly, and bake until the shells are dry enough to stay standing. That sequence gives steam time to lift the pastry and the structure time to set.
Try one tested recipe before changing anything, and judge the dough and shells with your eyes and hands as well as the clock. When you split a crisp cream puff and find that airy pocket inside, you’ll see exactly what the method was building toward.