
TL;DR
Kneading dough by hand requires watching for smoothness, elasticity, and passing the windowpane test. Over-kneading toughens the dough, so learning these cues helps you perfect your bread every time. Recent trends favor minimal handling, but traditional kneading remains effective with practice.
Imagine pulling your freshly kneaded dough and feeling that perfect stretch—like a well-tuned guitar string. That’s the moment you know your bread is about to become something special. But how do you know exactly when to stop kneading by hand? It’s not just a timer or a guess; it’s about reading your dough’s signals, like how a chef senses the right moment to flip a pan.
This guide will walk you through the key signs of properly kneaded dough, practical techniques to develop gluten, and how recent trends are changing the way we handle bread. With a little practice, you’ll master the art of kneading by feel—no more overworking or under-developing your dough.
Watch for a smooth, elastic, and slightly tacky dough as your cue to stop kneading.
The windowpane test is a quick, reliable way to confirm gluten development.
Over-kneading makes dough tough; learn to recognize the signs early.
Maintain a steady rhythm and use the heel of your hand for effective kneading.
Adjust hydration carefully—small water or flour additions can fix sticky or dry dough.
How to Know When to Stop
TL;DR: stop kneading when the dough is smooth, elastic, slightly tacky, and passes the windowpane test. The right moment feels like a soft, tuned stretch: resilient enough to spring back, relaxed enough not to tear.
8-10 min
Typical hand-kneading window for many standard bread doughs, with feel taking priority over the timer.
Windowpane
A thin, translucent stretch without tearing is the strongest readiness signal.
Stop Early
Over-kneading tightens gluten, making dough stiff, tear-prone, and harder to shape.
The Stop Signals
Hand-kneading is not a race against the clock. The dough tells you when gluten has developed enough to trap gas, rise well, and bake into a lighter crumb.
Smooth Surface
The shaggy look fades. Dough becomes more unified, less streaky, and easier to fold without tearing apart.
Elastic Pull
A small stretch resists, lengthens, and bounces back. Think soft rubber band rather than wet batter.
Windowpane Pass
Pinch off a piece and stretch it thin. If it forms a translucent sheet before tearing, kneading can stop.

Pwnllaf 13 Inch Danish Dough Whisk, 304 Stainless Steel Dough Whisk with Long Smooth Wooden Handle – Dutch Whisk Sourdough Bread Tools for Pizza, Pastry & Cake Batter Mixing Easy & Quick
【13 Inch 304 Stainless Steel Danish Dough Whisk】 – Danish whisk unique open-coil dual-loop heart-shaped flow design(stable and…
As an affiliate, we earn on qualifying purchases.
As an affiliate, we earn on qualifying purchases.
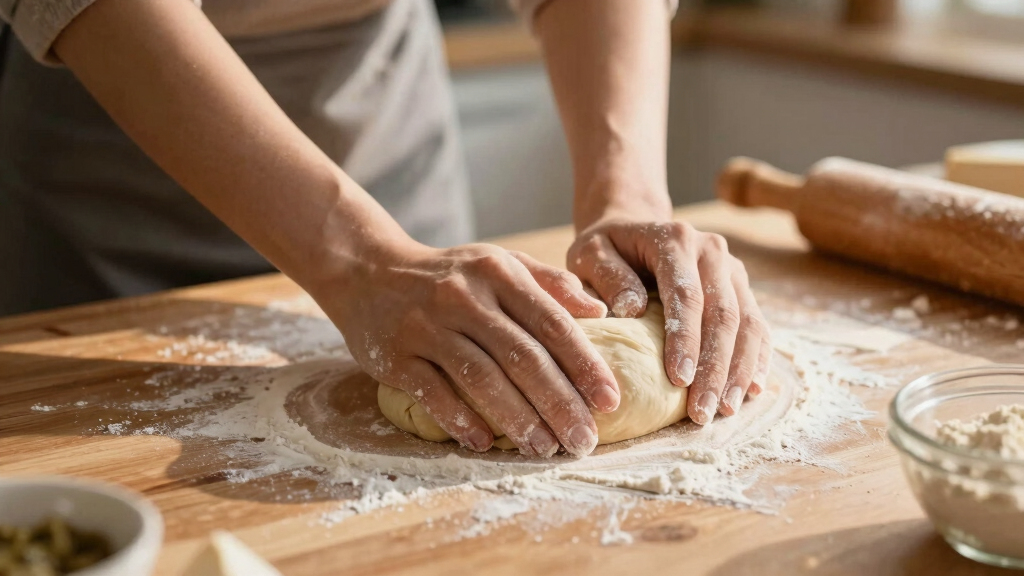
The Hand Rhythm
Use a steady push, fold, turn pattern. Consistent pressure builds gluten evenly without overworking one part of the dough.
Push
Use the heel of your hand to stretch the dough forward with controlled pressure.
Fold
Bring the far edge back toward you to layer and strengthen the gluten network.
Turn
Rotate 90 degrees so strength develops evenly across the whole mass.
Test
Pause periodically for a poke test or windowpane check instead of guessing.
Stop
When it is smooth, elastic, and slightly tacky, move on to fermentation.
The Sweet Spot
Vovoly Multipurpose Bench Scraper Kitchen Utensil for Flat Top Griddle, Dough Scraper Cutter for Bread and Pizza Cutter – Stainless Steel Metal Griddle Scraper Chopper
Thickened stainless steel – This bench scraper is made of thickened stainless steel, non-reactive, rust free, hygienic and…
As an affiliate, we earn on qualifying purchases.
As an affiliate, we earn on qualifying purchases.
Methods Compared
Traditional kneading gives the most tactile feedback, but modern lower-handling techniques can still build excellent structure when time and hydration are on your side.
| Method | What It Does | Best For | Feedback | Effort |
|---|---|---|---|---|
| Traditional Hand Kneading | Develops gluten through direct stretching and folding. | Artisan bread, skill-building, tactile control. | ✓ | ~ |
| Stretch-and-Fold | Builds strength gradually during bulk fermentation. | High-hydration doughs and relaxed schedules. | ✓ | ✓ |
| No-Knead | Uses long fermentation to develop gluten naturally. | Beginner-friendly loaves with minimal handling. | ~ | ✓ |
| Rushed Kneading | Stops before the gluten network has enough structure. | Rarely ideal unless the recipe expects low development. | ✗ | ✓ |

Sourdough Proofing Basket Gift Set, 9" Round and 10" Oval Banneton Bread Baking Supplies, Sourdough Baskets with Bread Lame, Danish Whish, Bowl Scraper, Sourdough Scraper, and Linen Liner
What You Get: 1 9-inch round banneton bread proofing basket , 1 10-inch oval proofing basket, 2 liners,…
As an affiliate, we earn on qualifying purchases.
As an affiliate, we earn on qualifying purchases.
Fix the Feel
Hydration tweaks should be tiny. Add flour or water one teaspoon at a time, then knead gently before deciding whether more is needed.
Add Flour Slowly
Dust in a teaspoon at a time. Too much flour makes dough stiff, slows expansion, and can produce a dense loaf.
Add Water Gently
Work in a teaspoon of water and let the dough relax. Hydrated gluten stretches more cleanly and tears less.

Etekcity Food Kitchen Scale, Digital Grams and Ounces for Weight Loss, Baking, Cooking, Keto and Meal Prep, LCD Display, Medium, 304 Stainless Steel
𝗘𝗳𝗳𝗼𝗿𝘁𝗹𝗲𝘀𝘀 𝗪𝗲𝗶𝗴𝗵𝗶𝗻𝗴: Supports 5 units (oz/lb:oz/fl'oz/g/mL), tare function, and includes 2 AAA batteries for hassle-free operation
As an affiliate, we earn on qualifying purchases.
As an affiliate, we earn on qualifying purchases.
Trace the Bread Logic
Every cue connects to structure: the better you read the dough, the less you depend on guessing, and the more consistent your loaves become.
What Does Perfectly Kneaded Dough Look and Feel Like?
When you knead dough by hand, the goal is to develop enough gluten so it’s elastic, smooth, and slightly tacky. Think of it like a soft, stretchy rubber band—resilient but not sticky. You’ll notice the dough becomes less sticky, more cohesive, and gains a gentle bounce with each fold. The best way to check? The windowpane test.
To do this, pinch off a small piece of dough and gently stretch it into a thin, translucent membrane. If it stretches without tearing, your gluten is well-developed. That’s your cue to stop kneading. For example, after about 8 minutes of consistent push, fold, and turn, this test becomes a quick, reliable way to gauge readiness. Recognizing the right stage is crucial because under-kneaded dough lacks structure and will not rise properly, while over-kneaded dough becomes too tight and can lead to dense bread. Achieving this balance ensures optimal texture and rise, which is why understanding these tactile cues is so important for bakers aiming for professional-quality results.
How to Spot the Signs You’ve Kneaded Enough (And Avoid Overdoing It)
Knowing when to stop kneading by hand is all about recognizing key signs. The dough should be smooth, elastic, and slightly tacky. When you poke it with your finger, it springs back slowly—like a soft, resilient rubber ball. This elasticity indicates that the gluten network is sufficiently developed to trap gas during proofing, leading to a good rise and airy crumb. If the dough feels sticky and loose, it’s a sign it needs more kneading or resting; over-kneaded dough, on the other hand, often feels very stiff, tears easily, and doesn’t bounce back. Overworking the gluten strands causes them to tighten excessively, which can create a dense, chewy loaf with less volume. Recognizing these signs early allows you to stop at just the right moment, preserving the dough’s extensibility and ensuring a light, tender crumb. The tradeoff is clear: insufficient kneading results in poor gluten structure and flat bread, while over-kneading toughens the final product. The key is to develop a feel for the dough’s changing texture as you work, so you can intervene at the optimal point for your specific recipe and environment.
Practical Tips to Perfect Your Kneading Rhythm
- Use the heel of your hand to push and stretch the dough—this gives you good control and strength, allowing for even gluten development without excessive effort.
- Turn the dough 90 degrees after each push to promote uniform gluten formation, preventing weak spots or uneven texture.
- Maintain a steady, rhythmic motion—think of it as a gentle dance—that fosters consistent tension and avoids overworking any one area of the dough.
- Periodically perform the windowpane test during kneading to monitor progress. This helps you catch the moment when gluten is sufficiently developed, avoiding guesswork and over-kneading.
- Adjust the kneading time based on how the dough responds. Typically, 8–10 minutes is enough for most bread recipes, but always rely on tactile and visual cues rather than just time. This mindful approach ensures your dough reaches its optimal elasticity, leading to better oven spring and crumb.
Think of kneading as a rhythmic massage—gentle, steady pressure that encourages gluten strands to align and strengthen. When done correctly, it creates a resilient, elastic dough that holds gas and rises beautifully. For example, as I knead my sourdough, I listen for the resistance to soften and the dough to become smooth and slightly tacky, signaling I should stop. The more attuned you are to these cues, the more consistent your results will be, and the less guesswork involved in achieving perfect bread.
Compare Traditional Kneading to Modern Techniques
| Method | What It Does | Best For |
|---|---|---|
| Traditional Hand Kneading | Develops gluten through physical stretching and folding, allowing tactile control and immediate feedback on dough’s condition. This method helps bakers learn the subtle changes in dough texture, fostering a deeper understanding of gluten development. | Artisan bread, when you want tactile feedback and a hands-on approach that can be adjusted on the fly. |
| Stretch-and-Fold | Gently develops gluten during bulk fermentation by periodically stretching and folding the dough, which helps build strength gradually without overworking. This technique is especially effective for high-hydration doughs that are difficult to knead traditionally. | High-hydration doughs, minimal effort, and when you prefer a more relaxed process that still achieves good gluten structure. |
| No-Knead | Relies on long fermentation times to naturally develop gluten, reducing physical effort. While it may produce slightly different crumb characteristics, it offers a simple way to get good results with less handling, ideal for busy schedules. | Quick, easy bread with minimal handling, suitable for beginners or those with limited time. |
Each method has its merits and tradeoffs. Traditional kneading gives you tactile control and immediate feedback, making it easier to fine-tune the process. Stretch-and-fold techniques reduce effort during rising and are excellent for high-hydration or delicate doughs. No-knead recipes leverage fermentation time to develop gluten naturally, which can be advantageous for those seeking simplicity without sacrificing quality. Understanding these differences helps bakers choose the method that best aligns with their baking philosophy, schedule, and desired bread characteristics. The key is recognizing that each approach influences gluten development’s speed and strength, and selecting the right one can make a significant difference in your baking results.
How to Adjust When Your Dough Is Too Sticky or Dry
If your dough feels sticky and unmanageable, adding a small amount of flour—about a teaspoon at a time—can help absorb excess moisture and improve handling. This prevents the dough from sticking to your hands or work surface, which can hinder proper kneading and gluten development. Be cautious not to add too much, as excessive flour can make the dough stiff and inhibit expansion during proofing, resulting in a dense loaf. Conversely, if your dough is too dry and crumbly, introducing a teaspoon of water and kneading gently allows the gluten network to hydrate and relax, improving extensibility. Small adjustments like these help maintain the delicate balance needed for optimal gluten formation and dough elasticity. For example, during a recent batch of whole wheat bread, I noticed the dough resisting kneading; adding a splash of water made it more manageable and resulted in a beautifully risen loaf. Remember, hydration levels influence gluten development profoundly—aim for about 60-65% hydration, which strikes a good balance for most bread recipes. Understanding how to fine-tune this balance ensures your dough develops the right structure without becoming overly sticky or dry, leading to consistent, high-quality bread every time.
Frequently Asked Questions
How long should I knead different types of bread dough?
Most standard bread recipes need about 8–10 minutes of kneading. Denser doughs, like whole wheat, may require slightly longer. Always look for signs like smoothness and passing the windowpane test, rather than sticking strictly to time.Can I over-knead dough by hand?
Yes. Over-kneading makes gluten too tight, resulting in a dense, chewy loaf. Pay attention to how the dough feels—if it tears easily or feels stiff, you’ve gone too far. Recognizing the signs early helps prevent this.What if my dough is too sticky or too dry?
Add small amounts of flour if sticky, or water if dry—about a teaspoon at a time. Adjust gradually, then knead gently until the dough reaches that ideal elastic, tacky texture. Proper hydration makes all the difference.Are there quicker methods to develop gluten without traditional kneading?
Yes. Techniques like stretch-and-fold during fermentation or no-knead recipes rely on time and gentle handling to build gluten. These methods reduce effort while still producing great bread.How do I know when my dough is ready to shape?
When it feels soft, elastic, and passes the windowpane test. It should bounce back slowly when poked and be smooth and slightly tacky. This indicates gluten is well-developed and ready for shaping.Conclusion
Mastering when to stop kneading by hand turns a simple task into a craft. By tuning into your dough’s texture, you’ll develop gluten just enough for a light, airy crumb—no guesswork needed.
Next time you knead, think of it as a conversation with your dough, listening for that perfect stretch. That’s when your bread is ready to rise and become something truly delicious.