
TL;DR

Get baking supplies delivered free with Prime
- Fast, free delivery on millions of items
- Prime Video, Amazon Music and more included
- Member-only deals all year
For most cakes, a light-colored, heavy-gauge aluminum pan is a versatile choice because it heats evenly and resists warping. Match the recipe’s shape and dimensions when possible; if you substitute a pan, keep the batter depth similar, avoid overfilling, and start checking for doneness early. Prepare the pan as the recipe directs, since even nonstick pans may need greasing or parchment.
A cake can follow the recipe to the letter and still come out with dark edges, a sunken middle, or a crumb that clings to the pan. Sometimes the missing ingredient is the pan itself. Its material, color, shape, and size affect how heat moves through the batter and how the finished cake releases.
This guide helps you how to pick a pan for the cake you want to bake, from tender layer cakes to dense Bundt cakes and quick breads. You’ll learn why a light aluminum pan is a useful starting point, when glass or silicone may call for closer watching, and what to do when the recipe’s pan is already in the sink.
You don’t need a cupboard full of specialty equipment. A small set of dependable pans, matched to the recipe and prepared with care, can make a noticeable difference. Think of the pan as the cake’s baking landscape: change its width or depth, and the batter has a different journey to the finish.
Choose a light-colored, heavy-gauge aluminum pan as a versatile starting point for many cakes.
Match the recipe’s pan shape and inside dimensions when possible; measure across the inside rim.
When substituting, compare capacity and keep batter depth similar, leaving room for the cake to rise.
Dark pans can brown edges faster, while glass and ceramic retain heat; adjust your checking habits to suit the pan.
Prepare even nonstick pans as directed, and judge doneness using the cake’s cues as well as the timer.
Baking field guide · Equipment essentials
How to Pick the Right Cake Pan for the Job
The pan shapes how heat reaches the batter, how quickly the center sets, and whether each slice releases cleanly. A few dependable choices can cover most cakes.
Key insight
Same batter. Different pan. A different journey to done.
Width and depth change the bakeThe quick read
Start with steady heat
A cake can follow the recipe and still emerge with dark edges, a sunken middle, or a crumb that clings. The pan is part of the recipe.
For many cakes, a sturdy, light-colored aluminum pan is a reliable choice because it heats evenly and resists warping. Match the recipe’s shape and inside dimensions when possible. If you substitute, compare capacity, keep batter depth similar, leave room to rise, and begin checking early. Prepare the pan as directed—even nonstick pans may need grease or parchment.
01 · Material
Favor sturdy aluminum
Quick, even heating helps edges and center bake at a more similar pace. Heavy-gauge metal is less likely to warp.
02 · Color
Choose light for ease
Dark pans can brown the bottom and edges sooner. Start checking early and use the center’s doneness cues.
03 · Shape & size
Keep the batter’s route
Shape and dimensions affect batter depth and heat travel. Follow the recipe’s pan when you can.
Choose your material
How different pans handle heat
There is no single best pan for every cake. Start with the bake you want, then account for how the material behaves.
Light aluminum heats quickly and evenly; heavy-gauge versions resist warping. A dependable choice for many layer and snack cakes.
Dark metal absorbs more surface heat and may brown edges faster. Check early; follow recipe guidance on temperature changes.
Glass or ceramic warms more slowly and holds heat longer. The cake may keep cooking after it leaves the oven.
Silicone releases easily but can brown differently and wobble when full. Set it on a firm baking sheet before filling.
Stainless steel generally heats less evenly than aluminum. Watch the cake’s cues rather than relying only on the timer.
Springform sides release delicate cakes, but the seam may leak thin batter. It is not a universal solid-tin substitute.
The geometry of a bake
Same volume, different depth
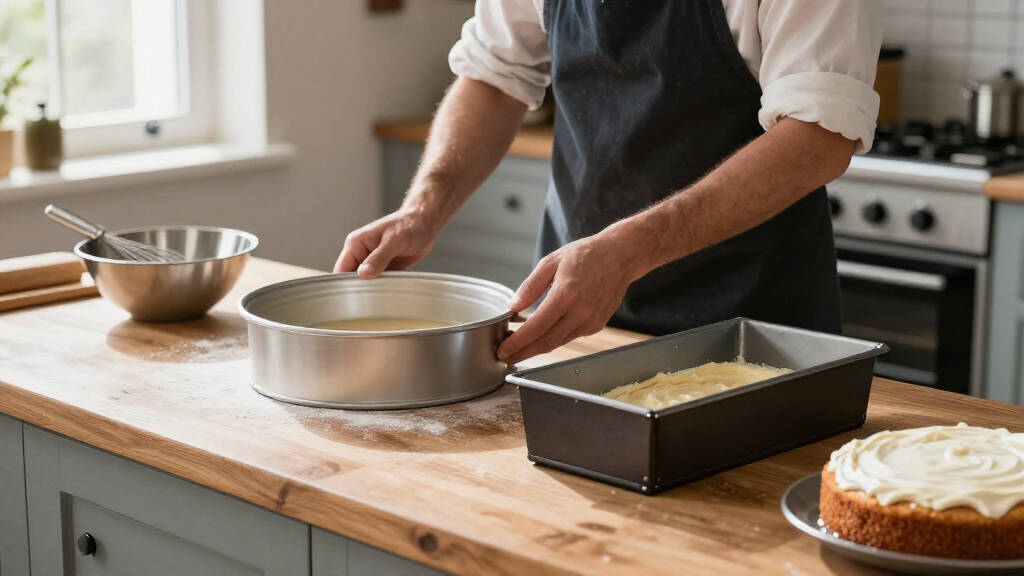
A wide, shallow pan spreads batter thinner, so it may bake faster. A narrow, deep pan keeps the center farther from hot surfaces, so it may need more time to set. Capacity alone does not tell the whole story.
One batch · two pan shapes
Shape sets structure
Match the pan to the cake
The pan’s form changes where the crust develops and how far heat must travel to reach the center.
| Pan shape | Good fit | What to keep in mind |
|---|---|---|
| Round | Layer cakes, many snack cakes | Useful for stacking layers; match the recipe’s diameter. |
| Square | Snack cakes, brownies | Same listed width as a round pan does not mean equal capacity. |
| Loaf | Pound cakes, quick breads | Deeper, narrower batter can leave the center needing more time. |
| Tube or Bundt | Dense cakes | Central opening gives heat another route; grease ridges carefully. |
| Springform | Cheesecakes, delicate cakes | Removable side helps release; seam may leak thin batter. |
When the recipe pan is busy
Substitute with a simple check
Dimensions usually describe the inside measurement across the top. Measure inside edge to inside edge, then compare depth and capacity too.
Measure inside
Check the top width from inner edge to inner edge, plus the pan’s depth.
Compare capacity
Estimate how much batter each pan holds and leave room for the cake to rise.
Match depth
Aim for a batter layer close to the recipe’s so the center sets on a similar schedule.
Check early
Treat bake time as an estimate. Use visual cues and a tester where appropriate.
Close batter depth
When the substitute holds the same amount at a similar depth, timing is more likely to stay close—but still check for doneness.
Deeper batter layer
A deeper layer can take longer to set in the middle. Avoid overfilling, which can cause overflow or an underbaked center.
Doneness cue: Use the recipe’s guidance along with the cake’s surface, set edges, spring, or a tester. A browned edge alone does not prove the center is ready.
Release is part of the result
Prepare the pan with care
Nonstick is a coating, not a guarantee. Follow both the recipe and the pan maker’s care instructions.
Grease and flour when the recipe calls for it, especially around detailed Bundt ridges.
Use parchment where appropriate to help release cakes from the base.
Place flexible silicone on a firm baking sheet before pouring or carrying batter.
Use the pan’s specific instructions; coating performance and care differ by product.
Keep this chain in mind
From pan choice to clean slice
A dependable result comes from matching the pan, managing the batter depth, and reading the cake as it bakes.
Choose a pan material that gives your cake steady heat
A light-colored, heavy-gauge aluminum pan is a versatile choice for many cakes because it heats quickly and tends to distribute heat evenly. That steady heat helps the center and edges bake at a similar pace. If you make one basic layer cake in it, you’re more likely to get a tender crumb without overly dark sides.
Aluminum is a dependable starting point, and thicker metal usually resists warping better than very thin pans. A flimsy pan can flex or twist as it heats, which may leave batter unevenly deep. Stainless steel generally heats less evenly, while glass and ceramic warm more slowly and hold heat longer; a cake can keep cooking after you take it out of the oven.
That retained heat can be useful for some bakes, but it changes the timing. If a recipe calls for a metal pan and you use a glass baking dish, watch the cake’s surface, edges, and center instead of trusting the listed minutes alone. For example, a dense snack cake may need a little more time for its middle to set even while the edges look done.
Silicone is flexible and often releases cakes easily, but it can brown differently from metal and may wobble when full. Set it on a firm baking sheet before you pour in batter; this gives you a stable base to carry to the oven. The best material depends on the cake, the maker’s care instructions, and whether even browning or easy release matters most.
- For a useful default: choose light-colored, sturdy aluminum.
- For glass or ceramic: allow for different heating and retained heat.
- For silicone: support the pan with a baking sheet and check browning.
Products Worth Considering

Le Creuset Signature 6.5-Quart Deep Round Dutch Oven with Light Gold Crucible Knob, Enameled Cast Iron, Bleu Riviera

Le Creuset Signature Enameled Cast Iron Round Dutch Oven, 5.5 qt, Deep Teal

Le Creuset Enameled Cast Iron Round Bread Oven, 9.5-Inch, Cerise
As an affiliate, we earn on qualifying purchases.
Pick a pan color that helps prevent overly dark edges
A light-colored pan is a forgiving choice for many cakes because it absorbs less heat at the surface than a dark pan. Dark metal can brown the edges and bottom faster, which is useful in some recipes but can be a nuisance when you want a pale, tender layer cake. If you’ve ever pulled out a cake with a dry brown rim and a soft center, pan color may be one part of the story.
Light pans give you a reliable baseline when you’re learning a recipe. They make it easier to judge whether the cake’s browning comes from the formula or from the equipment. The pan for the cake helps set the pace at the edges, much like the outer lane of a running track: the surface heats first while the middle catches up.
A dark pan isn’t automatically a mistake. You may already own one, or a recipe may be designed around it. In that case, check the cake earlier than the stated bake time and look for the recipe’s guidance on temperature adjustments. Some recipes recommend lowering the oven temperature slightly, but don’t apply that change blindly to every cake.
Imagine two identical batches of vanilla batter, one in a pale pan and one in a charcoal-colored pan. Their centers may need similar time to set, but the dark pan can give you a deeper edge color sooner. Keep the recipe’s instructions in view, and use browning as a cue, not the only test; a browned edge doesn’t prove the middle is ready.
Practical cue: When you switch from a light pan to a dark one, begin checking early and judge the center as well as the color at the edge.
Match the pan shape to the cake you want to bake
Choose the pan shape to match the cake’s batter and structure: round and square pans suit many layer and snack cakes, loaf pans suit pound cakes and quick breads, and tube or Bundt pans help dense batters bake through the center. A recipe’s shape is not just decoration. It changes how far heat must travel and where the cake forms its crust.
Round pans are a familiar pick for layered birthday cakes because you can stack the baked rounds with frosting between them. Square pans give snack cakes and brownies neat corners, though a square pan with the same listed width as a round one will not hold the same volume. A loaf pan creates a deeper, narrower shape, so a quick bread’s center may take longer to set than the edges.
Tube and Bundt pans put a hollow tube through the middle of the batter. That central opening gives heat another route into a dense cake, helping it bake through without relying only on heat from the outer walls. The pan’s ridges can make a handsome pattern, but they also create more surfaces where the batter can stick, so careful greasing matters.
A springform pan has a removable side that makes delicate cakes easier to release, including some cheesecakes. Its seam can leak thin batter, though, so it isn’t a universal replacement for a solid cake tin. If you’re making a thick batter, it may be a practical choice; for a runny cake batter, follow the recipe’s pan advice or protect your oven with a baking sheet if leakage is a concern.
For example, a dense chocolate batter poured into a plain deep round pan may need a different bake from the same batter in a Bundt pan. Keep the recipe’s intended shape when you can. When you can’t, think about the batter’s depth and how heat will reach its center.
Measure the pan and keep the batter at a similar depth
Pan size affects how deep the batter sits, and batter depth affects how long the center takes to bake. A wider, shallower pan spreads the same batter out, so it may bake faster; a narrower, deeper pan leaves the middle farther from the hot surfaces and may need more time. Matching the recipe’s stated dimensions is the simplest way to keep the cake close to its intended height and texture.
Pan dimensions usually refer to the inside measurement across the top, but labels and measuring habits can vary. If you’re unsure, measure inside edge to inside edge rather than across the outside rim. Also check the pan’s depth and capacity; two pans with the same diameter can still hold different amounts.
When substituting, compare capacity and aim for similar batter depth. A half-full pan in one recipe might be a safe guide, but filling advice varies with the batter and pan. Many cakes need room to rise, and filling around half to two-thirds full is common; follow the recipe when it gives a specific limit.
Suppose your recipe calls for two 8-inch round pans, but you have one wider pan. Pouring all the batter into the wider pan may create a thinner layer that finishes sooner, while putting it into a smaller pan risks overflow or a raw middle. Don’t fill past the recipe’s guidance just to use every drop. Bake extra batter separately in a suitable pan or muffin tin if you have enough batter for another portion.
Keep bake time flexible whenever the depth changes. Start checking earlier for a shallower cake, and give a deeper one more time only as needed. The recipe’s minutes are a starting point, not a promise that every pan will finish at the same moment.
Use this simple process when you have to substitute a pan
When you change pans, compare the dimensions and capacity, keep the batter depth close to the recipe’s, and treat the bake time as an estimate. This lets you make a sensible adjustment without pretending that a round tin and a loaf pan behave identically. Write the recipe’s original pan size beside your substitute so you can track what changed.
- Check the recipe pan. Note its shape, inside dimensions, material, and any fill guidance. A 9-inch round pan is not interchangeable with every pan labelled 9 inches.
- Measure your pan. Measure inside the rim and look for a capacity marking or manufacturer details. If you can’t find a capacity, compare width and depth and avoid a guess that leaves the batter much deeper.
- Keep the batter depth similar. Pour enough batter to match the recipe’s guidance, leaving room for the cake to rise. Don’t fill a smaller substitute to the brim.
- Prepare the pan as directed. Grease and flour, line with parchment, or use another method specified by the recipe. A nonstick label doesn’t promise that every cake will release cleanly.
- Begin checking early. Look at the cake before the listed finish time, then use visual cues and a tester suitable for that cake.
Here’s how that might look on a busy afternoon: you’re ready to bake a snack cake, but the square pan called for is already holding another batch. You find a round pan with roughly similar capacity, compare the depth, and keep the batter at a similar level. Since the round pan may change the bake, you check before the recipe’s final few minutes rather than leaving it unattended until the timer rings.
That process won’t give every substitute the exact same result. A very deep pan or a shape with different heat flow may still produce a different crust and crumb. But comparing capacity and watching the cake is far more reliable than assuming that matching a single measurement makes the pans equivalent.
Prepare the pan so the cake releases without tearing
Prepare the pan according to the recipe and the pan maker’s instructions; even nonstick pans may need grease, flour, or parchment. Preparation gives the cake a better chance of releasing in one piece, especially at corners, fluted sides, and other places where batter can grip. A layer cake that tears on the way out can still taste lovely, but a few minutes of prep can save you the repair job.
For many cakes, greasing the base and sides works well. Some recipes ask you to dust the greased pan with flour, while others use parchment to make it easier to lift out a flat cake. Use the method the recipe specifies, because a lining or grease can affect how certain batters climb the sides or form their crust.
A Bundt pan deserves special attention because its ridges create many small corners. Grease the details thoroughly, following the recipe and the pan’s care instructions, so batter doesn’t cling in a narrow groove. After baking, follow the recipe’s cooling directions before turning the cake out; removing it too soon or letting it sit too long can make release harder, depending on the cake.
Nonstick is not maintenance-free. Coatings vary and can lose effectiveness with wear, while aggressive utensils or cleaning may damage them. Silicone often releases easily, but the flexible sides can make it awkward to move when full, another reason to set it on a firm baking sheet before adding batter.
For example, if you’re making a tender lemon cake in a nonstick loaf pan, line the base with parchment if the recipe recommends it and grease the sides as directed. That small step gives you a better chance of lifting out a clean loaf rather than scraping sticky crumbs from the corners. Follow product care guidance, and avoid relying on vague claims such as “chemical-free” without clear manufacturer information.
Check doneness by the cake’s cues, not the timer alone
A timer tells you when to start checking, but the cake’s own cues tell you when it is done. Look for the signs the recipe describes: a set surface, edges pulling slightly from the pan, or a center that springs back when gently touched. A tester can help with many cakes; it should come out clean or with a few moist crumbs, depending on the recipe.
Don’t treat a toothpick as the right test for every bake. A cake with a moist or tender crumb may leave a few crumbs, while a very wet streak can point to an underbaked center. For a dense cake, a springy surface and set edges may add useful information. Use the recipe’s method when it offers one.
Pan changes make these checks more valuable. A dark pan can brown the bottom before the center has caught up, and a deeper pan can take longer than the recipe’s stated time. If you’ve swapped metal for glass, remember that glass retains heat; follow the recipe’s cooling directions and don’t assume a long rest in the pan fixes a raw center.
Picture a loaf cake whose top looks beautifully golden at the listed bake time. The edges have begun to pull from the pan, but the center still feels soft and leaves wet batter on the tester. That’s a reason to keep baking and check again, rather than taking it out because the outside looks ready.
For food safety, follow the recipe’s instructions and use a suitable thermometer when the recipe provides a target temperature. Keep hot pans on a stable, heat-safe surface, and use dry oven mitts when removing them. Careful checks protect the cake’s texture while helping you avoid serving batter that hasn’t baked through.
Build a small pan collection around the cakes you bake
You can bake a wide range of cakes with a few pans that match your most common recipes. Start with the shapes and sizes you use often, then add a specialty pan when a recipe genuinely calls for it. A cupboard full of rarely used equipment takes space without solving the everyday problem of matching pan depth and material.
For a home baker who makes birthday cakes, two matching light-colored round pans are more useful than several unrelated sizes. If you bake quick breads in winter, a sturdy loaf pan may earn its place. If you regularly make a dense Bundt cake for gatherings, the fluted pan can help it bake through and give you a decorative shape in one step.
When shopping, compare dimensions, capacity, care instructions, and coating details rather than relying on broad labels. Durable, heavier pans often resist warping better than very thin ones, though product quality varies. Coated pans, uncoated aluminum, silicone, and ceramic-coated options all have different performance and care needs; a “non-toxic” or “chemical-free” claim alone doesn’t tell you how a pan will bake or how long it will last.
Keep a note of the pan you used when a recipe works well: material, color, size, and whether you lined or greased it. That turns a good result into a repeatable one. If your next cake comes out with darker edges, you can check whether the pan color changed before rewriting the recipe.
Buy for your baking habits, not for a promise that one pan will do everything. A dependable aluminum round pan and a loaf pan may serve you more often than a specialty tin, while your own recipes can tell you when it’s time to add another shape.
Frequently Asked Questions
Which cake pan material works for most recipes?
Light-colored, heavy-gauge aluminum is a versatile choice for many cakes because it heats quickly and tends to bake evenly. Still, follow the recipe when it calls for another pan, since material can affect browning and bake time.
Should I choose a light or dark cake pan?
A light-colored pan is a forgiving default for many cakes. Dark pans can brown edges and bottoms faster, so check earlier and follow any temperature advice in your recipe.
Can I use a glass baking dish instead of a metal pan?
Often you can, but glass heats and holds heat differently from metal. Use the recipe’s guidance, then judge doneness by the cake’s cues rather than assuming the original timing still applies.
How full should I fill a cake pan?
Follow the recipe’s fill guidance because batters rise differently. Around half to two-thirds full is common for many cakes, but a smaller or deeper pan can change what’s safe and practical.
Do nonstick cake pans still need greasing?
They may. Follow the recipe and the pan maker’s instructions; a nonstick coating can wear, and some batters still cling without grease, flour, or parchment.
Can thin batter leak from a springform pan?
Yes. A springform pan’s removable seam is convenient for releasing delicate cakes, but it is not automatically leakproof. Thick batters may work well; for thin batter, use the recipe’s recommended solid pan or place the springform on a baking sheet if leakage is a concern.
Conclusion
When you choose a cake pan, match its shape, size, material, and color to the recipe as closely as you can. If you need a substitute, keep the batter depth similar, prepare the pan as directed, and begin checking early. Those few habits give you a better chance of an evenly baked cake that releases cleanly.
Think of the pan as the landscape your batter has to cross: make the route fit the cake, and the finished crumb has a better chance of arriving just right.