
TL;DR
Let baked goods cool for at least 1-2 hours before cutting to prevent crumbling, cracking, and loss of texture. Proper cooling ensures cleaner slices and enhances flavor.
Ever cut into a freshly baked cake or loaf and end up with a crumbly mess? It’s a common mistake, but one that’s easy to fix. The secret lies in patience. Allowing baked goods to cool properly unlocks their full potential—better texture, cleaner slices, and richer flavor.
This guide explains exactly why cooling matters, how long you should wait, and practical tips to keep your baked goods looking and tasting their best. Whether you’re baking bread or a delicate cake, knowing when to cut makes all the difference.
Always wait at least 1-2 hours for cakes and bread to cool before cutting.
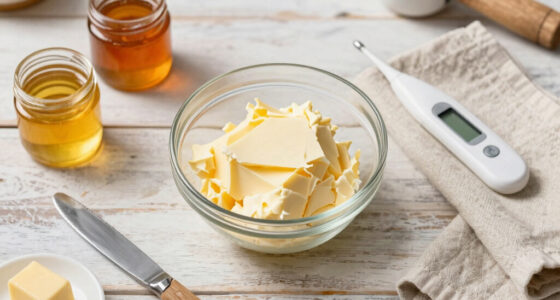
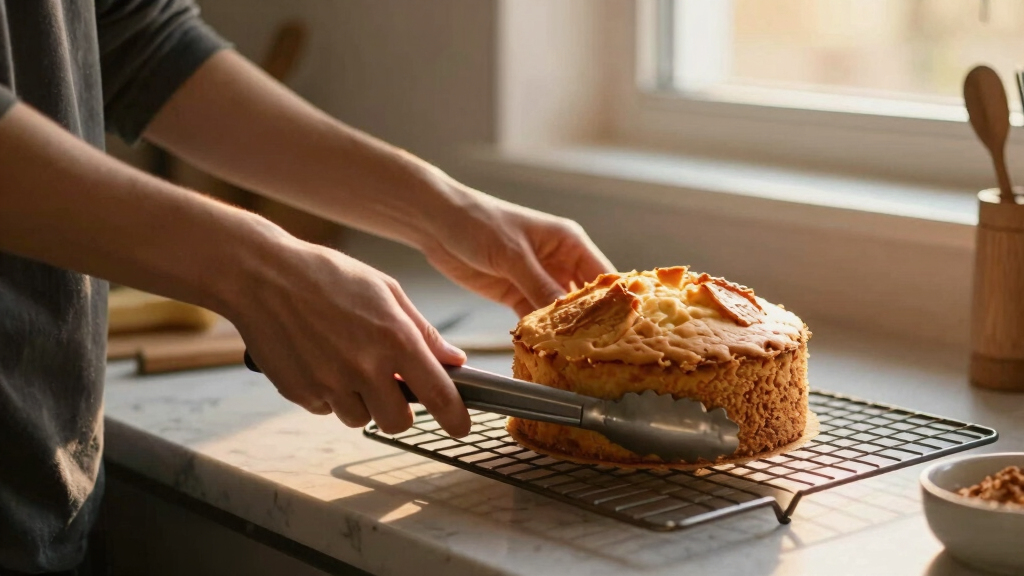
Use a wire rack and gentle airflow to speed cooling without damaging texture.
Cutting too early causes crumbling, tearing, and uneven slices—patience is key.
Test for readiness by gently pressing the top and checking for firmness and spring-back.
Use a serrated knife and clean between slices for the best presentation.
How Long to Let Bakes Cool Before You Cut Them
TL;DR: Let most cakes and breads cool for at least 1-2 hours before cutting. Cooling lets structure set, moisture redistribute, and flavor deepen, so your slices stay clean instead of crumbling, tearing, or turning gummy.
Room-temperature bakes are usually stable enough to slice neatly.
The safest window for cakes, pound cakes, and most home loaves.
Cutting too early interrupts the setting phase, causing fragile crumb, fast moisture loss, and messy edges.
Layer, sponge, and pound cakes need full cooling before clean cuts.
Loaves keep setting after the oven; dense bread may need longer.
Wait longer when you want firm squares and defined edges.
Wire racks cool evenly by letting airflow reach every side.
The practical wait-time map
Most baked goods are still fragile when they leave the oven. The right wait depends on size, density, humidity, and whether you need a casual slice or bakery-clean presentation.
Cakes: 1-2 hours
Let the crumb set fully before slicing or frosting. Warm cake can smear, crack, and shed crumbs.
Bread: 1 hour or more
Fresh loaves need rest so steam settles and the interior avoids a gummy, compressed cut.
Cookies & bars: 10-30 minutes
Short cooling works for many cookies; bars need more time when neat squares matter.

2PCS Cooling Racks for Cooking and Baking – 10" x 15"Heavy Duty Stainless Steel Wire Rack for Baking, Grilling, Roasting – Oven & Dishwasher Safe – Fits Jelly Roll Sheet Pan-Silver
QUALITY STAINLESS STEEL CONSTRUCTION: Made from food grade stainless steel instead of metal plating or coating, the grill…
As an affiliate, we earn on qualifying purchases.
As an affiliate, we earn on qualifying purchases.
The science of a clean slice
Cooling is an active phase. Starches, proteins, steam, and fat keep moving after baking, and the final texture forms as the temperature drops.
Heat Leaves
The bake moves from oven-hot to room temperature.
Moisture Settles
Steam redistributes instead of escaping through the cut face.
Structure Sets
The crumb firms enough to resist tearing and collapse.
Cut too early, lose the slice
Warm cakes can crack, cheesecakes can smear, and bread can collapse into a gummy interior. Once the structure fails, presentation and texture are hard to recover.

Orblue Serrated Bread Knife with Upgraded Stainless Steel Razor Sharp Wavy Edge – Bread Cutter Ideal for Slicing Homemade Bagels, Cake (8-Inch Blade with 5-Inch Handle)
ULTRA-SHARP, CUTS EFFORTLESSLY: The Orblue Serrated Bread Knife blade has an ultra-sharp serrated edge that grips and effortlessly…
As an affiliate, we earn on qualifying purchases.
As an affiliate, we earn on qualifying purchases.
What to do, what to avoid
Use this quick comparison when you are deciding whether to wait, cool faster, chill, or start cutting.
| Action | Clean Slices | Texture Risk | Best Use | Verdict |
|---|---|---|---|---|
| Cool completely on rack | ✓ High | ✓ Low | Cakes, loaves, bars, quick breads | ✓ Best default |
| Cut while warm | ✗ Low | ✗ High | Only recipes designed for warm serving | ✗ Avoid |
| Gentle fan airflow | ~ Medium | ~ Medium | Sturdy bakes when time is tight | ~ Use lightly |
| Refrigerate briefly | ~ Medium | ~ Medium | Some firm desserts, not delicate cakes | ~ Recipe-dependent |

Wilton Adjustable Cake Leveler – For Leveling and Torting – Quality Cake-Decorating Tool – Dishwasher Safe & Easy to Use – 12 x 6.25 Inch
Precise Cake Leveling: The Wilton Adjustable Cake Leveler is a classic cake trimming tool that uses a sturdy…
As an affiliate, we earn on qualifying purchases.
As an affiliate, we earn on qualifying purchases.
Five moves for bakery-level edges
Once the bake is cool, the knife work matters. Slow, clean, and steady slicing preserves the structure you waited for.
Use serrated
Saw gently through crusts and tender layers.
Cool fully
Room temperature gives the crumb its best chance.
Chill if useful
Firm desserts briefly when the recipe can handle it.
Slice slowly
Pressure creates squashing; patience keeps height.
Wipe blade
Clean between cuts for sharp, even presentation.

Cooling Racks for Cooking and Baking – 2 PCS 10" x 15" Grid Wire Baking Rack for Oven Cooking, Baking, Grilling, Roasting – Dishwasher Safe Bacon Rack – Fits Jelly Roll Cookie Sheet Pan
STURDY STAINLESS STEEL CONSTRUCTION: Our baking cooling rack is made of quality materials, prevents bending or deformation when…
As an affiliate, we earn on qualifying purchases.
As an affiliate, we earn on qualifying purchases.
Know when it is time to slice
These cues are more reliable than the clock alone, especially for larger, denser, or humid-day bakes.
Room temperature
The bake no longer feels warm at the center or base.
Spring-back top
A gentle press feels firm and returns without leaving a dent.
Clean tester
A toothpick or cake tester comes out clean from the center.
Edges release
Sides pull slightly away from the pan, showing structure has set.
Rack
Air circulates evenly.
Rest
Moisture stabilizes.
Test
Firmness confirms readiness.
Slice
Clean edges hold together.
Why Patience Pays Off: The Science of Cooling Bakes
Cooling isn’t just about waiting around. It’s about giving the structure time to set, moisture to redistribute, and flavors to deepen. When you remove a cake from the oven, it’s still in a state of flux—hot, fragile, and prone to crumbling if disturbed too soon.
Think of it like a cake’s version of a teenager going through growing pains. If you cut into it too early, it’s like pulling a teenager out of bed before they’re ready—cracks and tears happen. Let it sit, and it becomes strong, stable, and ready for slicing.
Research shows that the internal temperature of a cake or bread needs to drop to around 70°F (21°C) before it’s best to cut. This usually takes about 1-2 hours for most home-sized baked goods.
Delaying slicing allows the internal structure to fully stabilize, which means less crumbling and tearing. Cutting too early can also cause the moisture inside to escape rapidly, leading to dry or dense slices. The act of cooling is a critical phase for ensuring the integrity of your baked goods, making the difference between a beautiful, neat slice and a mess.
How Long Should You Really Wait? Timing That Works Every Time
Most baked goods need at least 1-2 hours of cooling time. Here’s a quick guide:
| Type of Bake | Cooling Time |
|---|---|
| Cakes (layered, sponge, pound) | 1-2 hours |
| Bread (loaves, baguettes) | 1 hour or more |
| Cookies & Bars | 10-30 minutes, longer if firm texture needed |
For larger or denser items, wait a bit longer. When in doubt, touch the top gently—if it feels firm and springs back, it’s ready.
Skipping this step often results in crumbled slices or uneven edges. Think of it like letting steak rest—patience yields a cleaner cut. The resting period allows the internal moisture and structure to settle, which is essential for neat, professional-looking slices and optimal flavor development. Rushing this process can compromise the appearance and texture, making your baked goods less enjoyable and harder to serve.
Speed Up the Cooling Without Ruining Your Bakes
Want to cut down wait times? Here’s how to do it without wrecking your baked good:
- Use a wire cooling rack—air circulates around, helping moisture escape faster. This promotes even cooling and prevents sogginess, especially in layered cakes or dense bread.
- Place smaller items in a cool, dry spot—avoid the fridge unless necessary, as cold can toughen some textures. Cold temperatures can cause rapid moisture loss or condensation, which impacts the final texture and appearance.
- For quick cooling, fan the baked good gently—just enough to accelerate heat loss, but not so much that it dries out. This method can be effective for certain desserts, but should be used cautiously to prevent uneven cooling or surface drying.
Note: Refrigerating a cake can sometimes make it dense or rubbery. Use this method only if you’re in a hurry and the recipe is forgiving. Understanding how different textures respond to rapid cooling helps you decide when speed is worth the risk and when patience is the better choice. Rushing cooling may save time, but it can also lead to undesirable changes—like a tough crust, uneven moisture distribution, or a gummy interior—so weigh the benefits against potential quality loss.
What Happens If You Cut Too Early? The Risks You Don’t Want
Cutting into a hot or warm baked good often leads to crumbling, tearing, and uneven slices. When you cut too soon, the structure is still fragile, and the internal moisture hasn’t settled.
Imagine slicing a freshly baked loaf and watching it collapse into a gummy mess. That’s what happens when you don’t wait—it’s a loss of presentation, texture, and sometimes flavor.
For example, a cheesecake that’s still warm will smear and crack, ruining its smooth top and perfect appearance. Patience preserves aesthetics and makes slicing easier. The internal setting process is crucial because it allows the proteins, starches, and moisture to reach equilibrium, which directly impacts the final look and mouthfeel of your baked goods. Cutting too early interrupts this process, causing structural failure and aesthetic issues that can’t be fixed after the fact. This can also lead to wasted ingredients and extra cleanup, as the mess is often more difficult to tidy up once the baked good is compromised.
Master the Art of Knowing When It’s Time to Slice
Here’s a simple checklist to tell when your baked good is ready:
- It’s at room temperature, usually 1-2 hours after baking.
- Gently press the top—if it springs back and feels firm, it’s good.
- Use a toothpick or cake tester—if it comes out clean, you’re set.
- Check the edges—if they’re pulling slightly away from the pan, it’s ready to cut.
Remember, patience is your best friend. Rushing it often leads to less-than-perfect slices. Recognizing the signs of proper cooling and structure stabilization ensures your slices look professional and taste their best. Developing an intuitive sense for doneness comes with experience and careful observation, but understanding these indicators helps you avoid common pitfalls and achieve consistently good results.
Your Best Practices for Perfect Cuts Every Time
Here are some tried-and-true tips for slicing baked goods:
- Use a serrated knife—saws through crusts and delicate layers gently.
- Let the baked good cool completely—no shortcuts here.
- Chill if needed—refrigeration can firm up some desserts for cleaner slices, but avoid overdoing it. This step helps lock in the structure, making the cutting process smoother and more precise.
- Slice slowly—rushing causes tearing or squashing.
- Clean your knife between cuts—wipe it down for neat, even slices.
Practicing these tricks turns slicing from a chore into an art. Proper technique combined with patience ensures that each slice maintains its integrity, presentation, and texture, elevating your baking to a more professional level.
Frequently Asked Questions
How do I know when my cake is cool enough to cut?
Look for the cake to be at room temperature, which usually takes about 1-2 hours. Gently press the top—if it springs back and feels firm, it’s ready. You can also insert a toothpick in the center; if it comes out clean, the cake has cooled sufficiently.
Can I cut a warm cake or bread?
It’s not ideal. Cutting warm baked goods often causes crumbling and tearing because the structure hasn’t set. For best results, wait until they reach room temperature, unless the recipe specifically states otherwise, like some quick breads.
What happens if I cut into a hot cake?
The slices will likely fall apart, look uneven, and be difficult to serve. The structure is still fragile when hot, and cutting too early can ruin presentation and texture.
Is refrigerating baked goods to cool them faster a good idea?
Refrigeration can speed cooling, but it may alter texture—cakes may become dense or rubbery. Use this method sparingly and only if the recipe allows. Usually, a wire rack and patience are better. Rapid cooling in the fridge can cause condensation and moisture imbalance, leading to sogginess or toughening of the crust. Rushing cooling can also cause uneven moisture distribution, resulting in less appealing slices and potential flavor loss.
How long before frosting or decorating?
Most cakes should be completely cooled—about 1-2 hours—before applying frosting. Frosting on a warm cake can melt or slide off, ruining the look and taste. Rushing this step can also cause the frosting to sink or slide, compromising the final presentation. Patience here ensures a smooth, professional finish and preserves the flavor integrity of your decorations.
Conclusion
Good things come to those who wait—especially in baking. Patience in cooling ensures your slices are clean, your textures perfect, and your flavors fully developed. The next time you bake, set a timer, take a deep breath, and resist the urge to cut early. Your taste buds and eyes will thank you.
Remember: in baking, as in life, patience often yields the sweetest results.