
TL;DR
The stencil trick is a quick, foolproof way to add eye-catching, bakery-quality decorations to cakes, cookies, and breads. It relies on laying a food-safe stencil over a dry surface and applying contrast media like powdered sugar or cocoa for crisp results. With a few tips, you’ll produce professional-looking designs easily at home.
Imagine turning a simple cake into a showstopper with just a quick dusting of powdered sugar. Or adding a delicate, crisp pattern on bread before baking. That’s the magic of the stencil trick. It’s the simplest way to get bakery-quality decoration with minimal fuss.
If you’ve ever admired those perfectly patterned cookies or cakes in magazines, chances are they used some form of stenciling. The best part? You don’t need fancy piping skills or expensive tools. Just a food-safe stencil, a few common ingredients, and a steady hand. Ready to transform your baked goods? Let’s break down exactly how this trick works—and how you can do it too.
Always start with a cold, dry surface for crisp, clean patterns.
Use light, even dustings from 6-10 inches for best results.
Lift the stencil straight up—never drag—to avoid smudges.
Choose media based on the surface’s moisture level—powdered sugar, cocoa, or royal icing.
Rearrange your design options by experimenting with textures, colors, and custom stencils.
The Stencil Trick for Bakery-Worthy Decoration
Lay down a food-safe stencil, add one light layer of contrast, then lift straight up. In seconds, a simple cake, cookie, cheesecake, or loaf gains a crisp professional pattern—without piping skills or expensive tools.
Crispness comes from three controllable conditions.
Stenciling is an old decorating method with Victorian-era roots. Its staying power is simple: contrast produces impact, a firm surface preserves detail, and a clean lift reveals the design.
Firm foundation
Chilled buttercream, ganache, fondant, firm cheesecake, cookie tops, and raw bread dough hold the stencil steady. Soft or warm surfaces encourage sticking and smudging.
Strong contrast
White sugar shines on dark chocolate; cocoa reads clearly on pale cream. Even a flawless pattern disappears when the medium and surface are too similar.
Controlled coverage
A light, even layer preserves fine openings. Too much powder creates ridges that spill when the stencil moves; wet icing can bleed beneath loose edges.
From plain surface to polished pattern.
The order matters. Prepare the surface first, stabilize the stencil second, then apply less medium than instinct suggests.
Chill
Firm the buttercream, ganache, or cheesecake so the stencil will not sink, stick, or slide.
Position
Lay a clean food-safe stencil completely flat. Remove wrinkles, gaps, crumbs, and moisture.
Anchor
Use a steady hand, a tiny dab of shortening, or a pin in a safe edge area to stop movement.
Apply
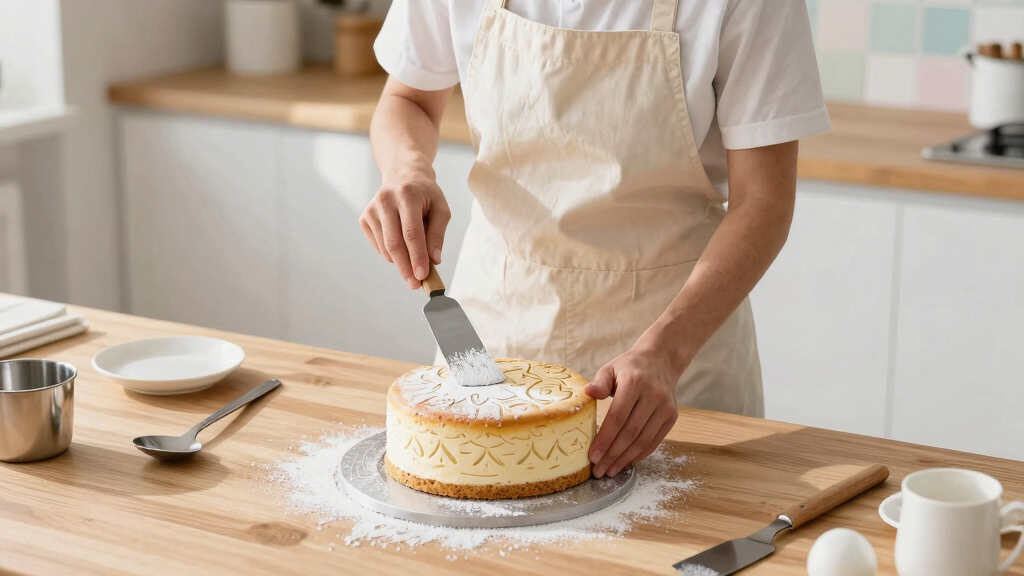
Sift powder from 6–10 inches above, or spread royal icing once with a clean offset spatula.
Lift
Raise the stencil straight up in one confident motion. Do not tilt, twist, or drag.
Match the decoration to the surface.
Moisture, color, serving time, and texture determine which medium will stay crisp. Powdered sugar is beautiful but temporary; cocoa and royal icing are more durable in the right setting.
| Medium | Best surface | Contrast | Staying power | Primary risk |
|---|---|---|---|---|
| Powdered sugar | Dark cake, brownie, dry cookie, tiramisu | ✓Excellent on dark finishes | ~Short on moist surfaces | ✗Dissolves within hours |
| Unsweetened cocoa | Cheesecake, pale cream, light buttercream | ✓Strong on pale finishes | ✓More moisture tolerant | ~Can darken over time |
| Royal icing | Fondant and flat cookie tops | ✓Custom color options | ✓Sets into a durable design | ✗Bleeds if too loose |
| Flour | Raw bread dough before scoring | ✓Bold after baking | ✓Bakes into the finish | ~May blur on wet dough |
| Luster or matcha | Dry fondant, cookies, firm chocolate | ✓High-impact specialty color | ~Depends on surface dryness | ✗Over-application smears |
Quick fix · For a white pattern that must last, choose non-melting “snow sugar” or decorate shortly before serving.
Cocoa + cheesecake
Strong contrast and less visible melting make cocoa forgiving on a pale, chilled surface.
Sugar + chocolate
Decorate near serving time for a striking white-on-dark finish with maximum definition.
Royal icing + cookie
Use icing thin enough to spread but stiff enough to stay above the stencil edges.
Dryness has the biggest effect on definition.
These relative performance scores visualize the practical hierarchy described by the technique: flatter, colder, drier surfaces consistently produce cleaner patterns.
Relative stencil clarity
If the pattern fails, check this first
The pattern looks fuzzy
The stencil shifted, the surface was soft, or powder was applied too close. Chill, stabilize, and sift higher.
The sugar vanished
Surface moisture dissolved it. Use snow sugar, switch to cocoa, or stencil immediately before serving.
Icing bled underneath
The royal icing was too loose or the stencil had gaps. Stiffen the icing and press the stencil flat.
Edges smeared during removal
Excess medium piled against the cutout or the stencil was dragged. Apply less and lift vertically.
Use food-grade mylar, PET, or acetate. Avoid random craft plastics, glue-contaminated cutting mats, and most 3D-printed surfaces; porous layer lines can trap residue. Hand-wash reusable stencils because high dishwasher heat may warp them.
Every sharp pattern follows the same chain.
If one link breaks, the design suffers. Use this sequence as a fast pre-decoration check.
Prepare carefully. Dust lightly. Lift decisively.
Common stencil questions, solved.
Start with a paper doily if you own no decorating tools. Once the basic lift feels natural, experiment with custom mylar, mesh stencils, colored cocoa, metallic powders, and bread art.
Can I use a paper doily?
Yes. It is the classic zero-equipment stencil. Keep it flat, use it only once, and avoid moist surfaces that soften or dissolve the paper.
How do I stop shifting?
Work on a cold, firm surface. Hold the stencil gently at a safe edge or anchor it with a tiny dab of shortening.
Can I stencil buttercream?
Yes—chill it until firm first. Apply a light dusting and lift without allowing the stencil to sink into the finish.
What can replace a store-bought stencil?
Try a doily, hand-cut parchment, clean lace designed for food contact, or cookie cutters used as masks.
How can I make the design more distinctive?
Layer textures, reverse light and dark media, combine flour stenciling with bread scoring, or order a food-safe personalized stencil for monograms, logos, and celebration dates.
A few seconds of dusting can change the whole bake.
The stencil trick is quick, versatile, and forgiving. Begin with a cold, dry surface; choose a medium with clear contrast; apply it sparingly; and lift straight up. That is the entire bakery-worthy secret.
High impact
What’s the secret behind the bakery-ready stencil trick?
The secret is laying a food-safe stencil over a dry, chilled surface and applying a contrast medium—like powdered sugar, cocoa, or royal icing—through it. When you lift the stencil, a crisp, clean pattern appears. This technique is effective because it relies on the contrast between the media and the surface, as well as the surface’s temperature and dryness, which influence how well the pattern holds. The higher the contrast and the drier the surface, the crisper and more durable the pattern will be, which is crucial for achieving that professional look. This method’s versatility allows you to create intricate designs on a variety of baked goods, but understanding why certain conditions matter helps you troubleshoot and refine your approach—such as knowing that moist surfaces cause bleeding or that too much media can smudge the pattern. Recognizing these tradeoffs guides you to make better choices for different decorating scenarios, ensuring consistent, high-quality results every time.
As an affiliate, we earn on qualifying purchases.
How to get perfect stencil results every time
- Chill your surface: Cold, firm surfaces like chilled buttercream or ganache prevent the stencil from slipping and help media stay in place, which is vital for sharp patterns. Warmer or softer surfaces tend to cause media to bleed or smudge, diminishing the precision of your design. This step ensures a stable base, especially when working with delicate contrast media.
- Choose the right stencil: Use food-safe materials like mylar or acetate because they are non-porous and won’t absorb moisture or colors, which could distort your design or cause contamination. Keeping the stencil flat and clean avoids wrinkles or debris that could interfere with the pattern’s clarity. Selecting the proper material and maintaining it properly directly impacts the crispness and longevity of your decoration.
- Position carefully: Gently lay the stencil flat without wrinkles or gaps. Using a tiny dab of shortening or a pin to anchor it prevents shifting during dusting, which is critical because even slight movement can cause blurring or misalignment. Proper positioning ensures your pattern is precise and symmetrical, which enhances the professional appearance of your baked goods.
- Sift from the right height: Hold your sifter at 6-10 inches above the surface to control the amount of media applied and prevent overload. Dust evenly through the stencil with a steady hand. Excess media or uneven application can cause bleeding or a fuzzy pattern, so understanding the importance of distance and technique helps you achieve clean, sharp results.
- Lift straight up: Remove the stencil in a single, upward motion without dragging it across the surface. This prevents smudging or smearing the pattern. A clean lift preserves the crispness of the design, which is essential for a professional look. Mastering this simple step makes a noticeable difference in the final presentation.
Once you’ve mastered the basic technique, you can start experimenting with different designs and media to customize your decorations. For example, using colored cocoa or edible metallic powders can add a unique touch. Remember, the key to success is consistency and patience—practice makes perfect, and each attempt will improve your results.
As an affiliate, we earn on qualifying purchases.
Frequently Asked Questions
Can I use a paper doily as a stencil?
Yes, a paper doily makes an excellent, inexpensive stencil. Just lay it flat over your surface, and dust or spread media through it for a delicate pattern. Keep in mind, doilies are single-use, and avoid moist surfaces that dissolve paper.Why did my powdered sugar pattern disappear quickly?
Powdered sugar dissolves into moist or warm surfaces within hours. To extend the pattern’s life, use non-melting snow sugar, decorate shortly before serving, or opt for cocoa on dry surfaces. Keeping the surface cold helps as well.How do I prevent my stencil from shifting?
Use a tiny dab of shortening or a pin to gently anchor the stencil. Also, ensure the surface is cold and firm, and handle the stencil with care to keep the pattern precise while dusting.Can I stencil on buttercream?
Yes, but the buttercream must be chilled and firm. A cold surface prevents media from sinking or smudging. Lightly dust with cocoa or powdered sugar for sharp designs, then let it sit to set before serving.Are food-safe stencils necessary?
Absolutely. Use materials like mylar or acetate, which are food-grade and durable. Avoid craft plastics or reusing materials that touched glue or non-food substances to prevent contamination.As an affiliate, we earn on qualifying purchases.
Conclusion
The stencil trick transforms simple baked goods into professional-looking treats without the fuss of piping or intricate icing. It’s quick, versatile, and surprisingly forgiving. Next time you want a bakery-worthy touch, grab a stencil and dust away—your creations will thank you.
Imagine the look on your family’s faces when they see that perfect pattern on your homemade cake. That’s the power of this simple technique—delivering beauty with just a few seconds of dusting. So, why not give it a try? Your baked goods deserve it.
As an affiliate, we earn on qualifying purchases.