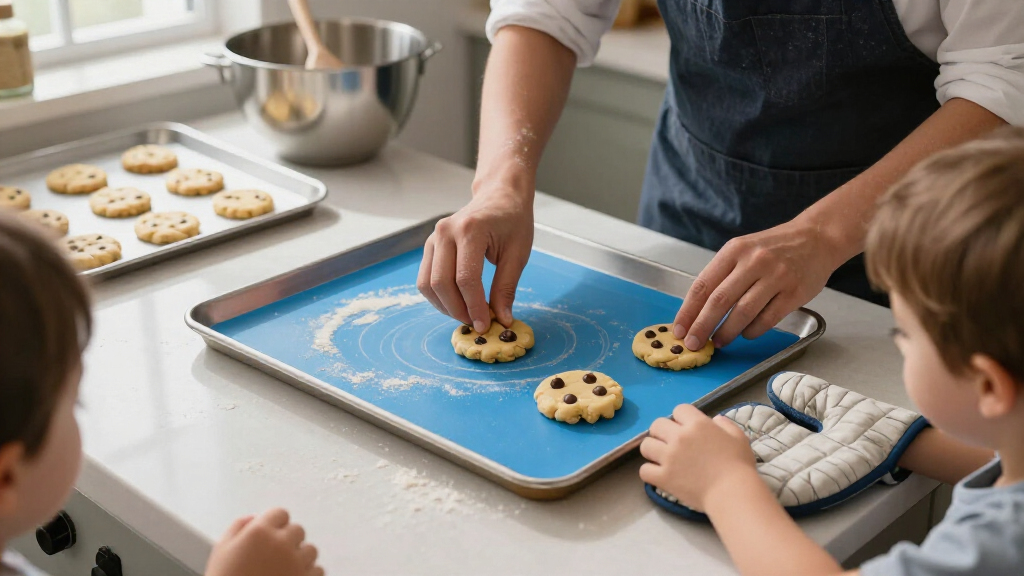

This guide shows beginner home bakers how to prepare a silicone baking mat, place it on a compatible baking sheet, bake with it, and clean and store it without damage. You will finish with a properly baked result and a mat that is ready for its next use. Allow about 5-10 minutes for setup and cleanup, in addition to the recipe’s baking time.

Get baking supplies delivered free with Prime
- Fast, free delivery on millions of items
- Prime Video, Amazon Music and more included
- Member-only deals all year

Zulay Kitchen Silicone Baking Mats, 2-Pack, 16.5 × 11.6 in, Dark Gray

GTJ Silicone Baking Mat Roll, Reusable Baking Sheet Liners, 12 in x 6 ft
Difficulty: Beginner | Time: 5-10 minutes of setup and cleanup per baking session
What You’ll Need
Tools & Materials:
- Food-grade silicone baking mat
- Compatible, flat-rimmed baking sheet
- Dish soap and a soft sponge or cloth
- Clean kitchen towel or drying rack
Knowledge:
- Basic oven use
- How to follow a recipe’s temperature and baking-time instructions
Read the mat’s packaging or care instructions before use. Confirm its maximum temperature and whether it is approved for your intended appliance. Mats vary, and the manufacturer’s limits take priority. Do not use a mat that is torn, sticky, unusually brittle, or otherwise damaged.
Zulay Kitchen Silicone Baking Mats, 2-Pack, 16.5 × 11.6 in, Dark Gray
The Zulay Kitchen 2-pack earns our top spot by making the basic silicone-mat decision simple: you get two matching, precut liners sized at 16.5 × 11.6 inches. That is a more convenient starting point than the GTJ roll, which must be cut before it fits a particular tray, and less involved than sorting through the different shapes in the MMmat set. For a household that mostly bakes on standard rectangular sheets, having a pair ready to rotate between batches is a useful everyday advantage.The food-grade, BPA-free silicone is listed for use up to 480°F, with oven, microwave, and freezer compatibility. The nonstick surface is intended to reduce reliance on parchment or cooking spray, while dishwasher-safe cleaning makes repeated use less of a chore. Its lifetime guarantee is another meaningful point of differentiation in this lineup, although a warranty is not a substitute for following care and temperature directions.The compromise is flexibility. Unlike MMmat’s round and square pieces or GTJ’s cut-to-fit length, Zulay’s two identical mats only cover the dimensions supplied. They also roll for storage, which is compact but may not suit anyone who wants liners to lie flat in a drawer. We see this as the most straightforward choice for routine sheet-pan baking, not the most adaptable option for specialty pans.
Pros:
- Two matching, precut 16.5 × 11.6-inch mats simplify everyday sheet-pan use.
- Reusable nonstick surfaces can reduce dependence on parchment and cooking spray.
- Dishwasher-safe construction supports convenient cleanup.
- Listed for oven, microwave, and freezer use, with a lifetime guarantee.
Cons:
- The fixed dimensions may not fit smaller, larger, or unusually shaped pans.
- Rolling for compact storage may be less convenient than keeping a mat flat.
Best for: Bakers who mainly use standard rectangular sheet pans and want two ready-to-use, dishwasher-safe liners.
Not ideal for: People who need round or square pan coverage, exact custom dimensions, or mats that store flat without rolling.
Bottom line: For routine rectangular-sheet baking, Zulay offers the clearest balance of ready-to-use sizing, easy cleaning, and two-mat convenience.
“For routine rectangular-sheet baking, Zulay offers the clearest balance of ready-to-use sizing, easy cleaning, and two-mat convenience.”
MMmat Reusable Silicone Baking Mats, Set of 6
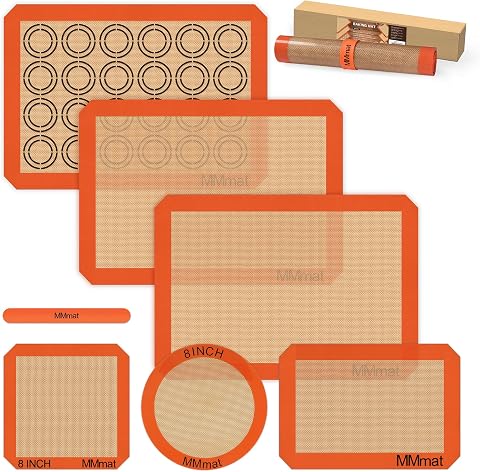
If one liner size will not cover your baking, MMmat’s six-piece assortment is the most versatile configuration here. It includes two half-sheet mats, a cookie half-sheet mat, a quarter-sheet mat, an 8-inch round mat, and an 8-inch square mat. That combination reaches beyond Zulay’s two identical rectangular liners and avoids the measuring-and-cutting step required by the GTJ roll. We would choose it for a kitchen that regularly switches between sheet pans and smaller or shaped baking surfaces.The listed 0.75 mm thickness gives buyers a concrete construction detail to compare, and the mats are rated to 500°F (260°C), the highest stated maximum in this group. They are also described as food-grade WACKER silicone, BPA-free, PFOA-free, freezer-safe, and dishwasher-safe. The higher heat ceiling may be useful for recipes that call for temperatures above the 480°F limits listed for Zulay and GTJ, provided the recipe and cookware are otherwise compatible.More pieces bring a practical cost in organization: six separate mats take more storage space and may not all be needed by someone who bakes on a single sheet pan. The product information also clarifies that the set is not made in Germany despite the German-silicone description, so buyers should distinguish the stated silicone material from manufacturing origin. Compared with Zulay, MMmat wins on shape variety and heat rating, but gives up the simplicity of a matching two-piece set.
Pros:
- Six pieces cover half-sheet, quarter-sheet, round, and square formats.
- Stated maximum temperature of 500°F is higher than the other two options.
- Food-grade silicone is listed as BPA-free and PFOA-free.
- Freezer-safe and dishwasher-safe for broader use and simpler cleanup.
Cons:
- The assortment requires more storage and organization than Zulay’s two-mat set.
- Several sizes may go unused if your baking is limited to one standard pan.
- The product is not made in Germany despite its German-silicone description.
Best for: Home bakers who use several pan sizes and want rectangular, round, and square silicone liners in one assortment.
Not ideal for: Bakers who only need one standard sheet-pan liner or have limited space to store several separate mats.
Bottom line: MMmat is the strongest choice when shape variety and a higher listed heat limit matter more than keeping the set compact and simple.
“MMmat is the strongest choice when shape variety and a higher listed heat limit matter more than keeping the set compact and simple.”
GTJ Silicone Baking Mat Roll, Reusable Baking Sheet Liners, 12 in x 6 ft
The GTJ silicone mat roll is the clear specialist in this comparison: at 12 inches wide and 6 feet long, it lets buyers cut liners to the lengths they actually need. That adaptability can be more useful than Zulay’s fixed 16.5 × 11.6-inch mats when trays are nonstandard, or when you want a custom liner for a countertop task such as rolling dough. Unlike MMmat’s preset assortment, the roll lets you decide where each piece begins and ends.Its food-grade silicone is described as BPA-free and PFOA-free, with reinforced fiberglass backing and a nonstick, dishwasher-safe surface. The stated operating range is -40°F to 480°F, which supports the listed freezer-to-oven versatility. This is a broad range for one liner, but the stated top temperature is below MMmat’s 500°F maximum. Buyers should also note that the listed thickness is just 0.012–0.016 inches (0.3–0.4 mm), thinner than MMmat’s 0.75 mm specification.Customization is not automatic convenience: you need scissors or a knife, careful measuring, and a suitable surface for trimming. A thin roll may also be less reassuring for handling very heavy loads. We would select GTJ when an exact fit or extra custom lengths solve a real problem; for someone who simply wants to line a standard tray and start baking, Zulay is the easier purchase, while MMmat provides more ready-made shapes.
Pros:
- Six-foot roll can be cut to suit unusual pan dimensions or project lengths.
- Reinforced fiberglass backing is specified for added durability.
- Food-grade material is listed as BPA-free and PFOA-free.
- Nonstick and dishwasher-safe, with a stated range from -40°F to 480°F.
Cons:
- Requires scissors or a knife and careful measuring before use.
- Its listed 0.3–0.4 mm thickness is thinner than MMmat’s stated 0.75 mm.
- The product information cautions that thin material may not suit very heavy loads.
Best for: Bakers with nonstandard pan dimensions or countertop projects who are comfortable measuring and trimming a long liner.
Not ideal for: Anyone who wants a ready-to-use mat immediately, dislikes cutting materials, or needs a sturdier-feeling option for heavy loads.
Bottom line: Choose GTJ when custom dimensions are the priority, but skip the roll if you want a thick, ready-cut liner with no prep.
“Choose GTJ when custom dimensions are the priority, but skip the roll if you want a thick, ready-cut liner with no prep.”
As an Amazon Associate we earn from qualifying purchases.
Before You Start
Check that the mat fits the baking sheet without folding, bunching, or hanging over the edges. A silicone mat is a baking surface, not a substitute for a sturdy pan; do not place it directly on an oven rack. Keep it away from open flames, stovetop elements, broilers, and sharp tools. Many mats are not intended for cutting, and cutting on one can damage it. Unless the manufacturer says otherwise, do not grease the mat: added oil or spray can leave a residue and may affect results.
Step-by-Step Instructions
Step 1: Check the mat and recipe
Inspect both sides of the mat for cuts, cracks, sticky patches, or baked-on residue. Read the product instructions for temperature limits and appliance restrictions, then compare those limits with the recipe. If the recipe requires a temperature above the mat’s rating, use parchment paper or another suitable baking surface instead.
Tip:Some recipes are written for bare metal or parchment and may bake differently on silicone. Follow any product guidance about adjusting temperature or baking time; do not guess at a large temperature change.
Check: The mat is intact, clean, and rated for the oven temperature and type of use you plan.
Step 2: Wash and dry the mat before first use
Wash a new mat with warm water, dish soap, and a soft sponge, unless its care label gives different instructions. Rinse away all soap and dry both sides completely with a clean towel or on a drying rack. For a mat that is already clean and dry, skip this step.
Tip:A clean, dry mat helps prevent old grease, dust, or storage residue from affecting food. Avoid abrasive scrubbers that can scratch or wear the surface.
Check: The mat has no visible debris or soap film and feels dry before it goes on the pan.
Step 3: Set the mat on a baking sheet
Place the baking sheet on a level counter. Lay the mat flat on the sheet with its marked food-contact side facing up, if the manufacturer identifies one. Smooth out any curls or wrinkles so the mat sits within the pan’s rim. Do not stretch, trim, or fold it to make it fit.
Tip:Set the pan on the counter before adding dough or batter. A flexible mat loaded with food can bend if you try to carry it by itself.
Check: The mat lies flat, stays within the pan’s rim, and has no curled edges that could catch food or interfere with baking.
Step 4: Arrange the food on the mat
Place cookies, vegetables, or other recipe items on the mat with the spacing and portion sizes specified in the recipe. Keep food away from any exposed pan area where drips could bake on. Do not grease the mat unless its instructions or the recipe specifically call for it, and do not cut food on the mat.
Tip:Silicone can make dough or small items easier to move after baking, but it does not prevent every recipe from sticking. For delicate foods, follow the recipe’s release and cooling instructions.
Check: Food is arranged evenly, the mat remains flat, and no ingredient is placed where it could spill over the edge.
Step 5: Bake on the center rack
Hold the baking sheet by its edges and slide it onto the oven’s center rack. Bake at the recipe temperature, provided it falls within the mat’s rated limit. Use the recipe’s timing as a starting point and check the food for its specified doneness cues. Avoid placing the mat near a heating element or under a broiler.
Tip:Do not assume the mat will brown food exactly like bare metal. Check the underside and edges of the food for doneness, and add time only as needed.
Check: The mat stays supported by the pan throughout baking, and the food reaches the recipe’s doneness cues without the mat scorching or shifting.
Step 6: Cool the pan and remove the food
Take the baking sheet out using oven mitts and set it on a heat-safe surface. Let the food cool for the time the recipe specifies, then lift or remove it with a spatula or other non-sharp utensil. Let the mat cool before handling it for washing.
Tip:Do not lift a hot, food-loaded mat away from the pan. Its flexibility can cause food to slide, and the mat may be too hot to handle safely.
Check: The food releases without cutting or scraping the mat, and the mat is cooling on a stable, heat-safe surface.
Step 7: Wash, rinse, and dry the mat
Once cool, wash the mat with warm water, dish soap, and a soft sponge or cloth. Clean both sides, paying attention to greasy areas, then rinse thoroughly and dry fully. Use a dishwasher only if the manufacturer says the mat is dishwasher-safe, and position it so it does not contact a heating element.
Tip:Do not use knives, metal scrapers, steel wool, or harsh abrasive cleaners. They can damage the surface and make the mat harder to clean.
Check: The mat has no food residue, grease film, or soap left on it and is completely dry before storage.
Step 8: Store the mat without creasing it
Roll the dry mat loosely or store it flat, following the product’s directions. Keep it in a clean, dry cupboard away from sharp utensils, direct heat, and heavy objects that could cut, stretch, or permanently crease it.
Tip:If you roll the mat, avoid tight bands that compress it. A loose roll helps it lie flat when you use it again.
Check: The mat is clean, dry, uncut, and stored where it will not be crushed or exposed to heat.
Common Mistakes to Avoid
- Putting away a damp mat or scrubbing it with abrasive tools. — Wash gently, rinse well, and dry both sides fully before storage.
Troubleshooting
Problem: Food sticks to the mat after baking.
Solution: Let the food cool for the time specified in the recipe, then loosen it with a silicone or other non-sharp spatula. Wash off any residue. For the next batch, check that the mat is clean and follow the recipe’s release guidance; some foods still need time to set before removal.
Problem: The mat smells oily or feels greasy after washing.
Solution: Wash both sides again with warm water, dish soap, and a soft sponge, then rinse thoroughly. Let it dry fully. Avoid using extra cooking spray, which can leave a persistent film.
Problem: The mat curls or shifts on the baking sheet.
Solution: Lay it flat on a compatible pan and smooth the edges before adding food. If it remains curled or does not fit within the rim, do not force it; use a better-fitting sheet or another baking surface.
Problem: The food browns or cooks differently than the recipe predicts.
Solution: Check the food’s doneness rather than relying only on the stated time. Note how the mat performs with that recipe, and adjust the next batch’s timing in small increments. Follow the mat maker’s temperature guidance instead of exceeding its rating.
What Success Looks Like
The food is baked to the recipe’s doneness cues, the mat has stayed flat and supported on the baking sheet, and the mat shows no scorching or damage. Afterward, it is free of food and greasy residue, fully dry, and stored flat or loosely rolled according to its care instructions.
Next Steps
Before each later use, inspect the mat and wash it if dusty or greasy. Keep a note of any recipe that needs a small timing adjustment on your oven. Replace the mat if it becomes cut, cracked, brittle, sticky in a way that cleaning does not resolve, or otherwise damaged. Follow the manufacturer’s directions for disposal and for any use beyond oven baking.
Frequently Asked Questions
Do I need to grease a silicone baking mat?
Usually not. Silicone mats are designed to provide a reusable baking surface, and added grease or cooking spray can leave a residue. Check the mat’s instructions and recipe; follow them if they specifically call for greasing.
Can I put a silicone baking mat directly on the oven rack?
No. Place it on a flat, sturdy baking sheet so it stays supported when you load, bake, and remove food.
Can I cut on the mat or use it under the broiler?
Do not cut on it unless its manufacturer explicitly permits cutting; sharp tools can damage the surface. Do not use it under a broiler unless the product instructions specifically approve that use.
Can I wash a silicone baking mat in the dishwasher?
Only if the manufacturer labels it dishwasher-safe. If you use a dishwasher, place the mat securely and keep it away from heating elements. Hand-washing with dish soap and a soft sponge is suitable for many mats.
How should I store a silicone baking mat?
Store it completely dry, either flat or loosely rolled as directed by its manufacturer. Keep it away from sharp objects, direct heat, and heavy items that could damage or crease it.
Halloween Picks

Fun Costumes Creepy Twin Boys Halloween Animatronic

3 ft. Halloween Groundbreaker Skeleton for Outdoor Decoration

Panefright Halloween Window Projector
As an affiliate, we earn on qualifying purchases.