
TL;DR
Dense bread usually results from underproofing, poor gluten development, or low hydration. Fixing these involves simple adjustments like longer fermentation, proper kneading, and correct ingredient ratios, making better bread accessible for everyone.
Ever pull a loaf from the oven and wonder why it feels like a brick? You’re not alone. Many home bakers wrestle with dense, heavy bread, thinking it’s something complicated or out of reach.
The good news? The fix is often simpler than you’d imagine. Small tweaks in your process—like adjusting proofing times or hydration—can turn that dense loaf into airy, tender bread you’ll love.
In this guide, I’ll walk you through the common pitfalls that cause heavy bread and show you practical, easy fixes. No fancy equipment or obscure techniques—just straightforward tips that make a real difference.
Proper gluten development is fundamental; spend extra time kneading or folding to build elasticity.
Ensure your dough is fully proofed; use the poke test to confirm readiness and avoid underproofing.
Active yeast is essential; proof it first or use fresh yeast to guarantee rise.
Hydration levels impact bread lightness; higher water content generally creates airier crumb.
Baking with steam and preheated equipment helps maximize oven spring and crumb texture.
Is Your Dough Too Tight? How Gluten Development Makes or Breaks Your Bread
Gluten is the structure behind good bread. When you knead or fold dough properly, you encourage gluten strands to stretch and align, trapping gas and giving your bread its rise and airy crumb.
If your dough feels stiff or doesn’t hold its shape well, it’s a sign gluten isn’t developed enough. This results in a dense, heavy loaf.
Developing gluten is crucial because it creates the elastic network that holds the gases produced during fermentation. Without sufficient gluten, the dough can’t trap these gases effectively, leading to a compact, heavy crumb. Overworking the dough, however, can make it tough and difficult to shape, so finding the right balance is key.
For example, if you skip kneading or don’t knead long enough, the dough won’t have enough elasticity. Think of it like a rubber band—without enough stretch, it can’t hold the air and gas that make bread fluffy.
To fix this, incorporate a simple stretch-and-fold during bulk fermentation or knead a bit longer. Using a high-protein bread flour can also help develop stronger gluten networks, which contribute to a lighter, more open crumb. Proper gluten development ensures your dough can expand fully during baking, giving you that desirable airy texture.

Superbaking Sourdough Banneton Bread Proofing Basket, 9" Round, Set of 2
- Bake Two Loaves Simultaneously: Includes two 9-inch round proofing baskets
- Splinter-Free, Smooth Finish: Made of premium Indonesian Rattan with polished surface
- Includes BakeSide App Access: AI baking assistant for guidance and scheduling
As an affiliate, we earn on qualifying purchases.
As an affiliate, we earn on qualifying purchases.
Are You Underproofing? How to Know When Your Dough Is Ready to Bake
Underproofed dough is the biggest culprit for dense bread. When dough hasn’t had enough time to expand, it doesn’t create those large holes and airy crumb you’re after.
Imagine pressing gently into the dough; if it springs back immediately and leaves no mark, it’s not ready. If it slowly dents and stays, it’s time to bake. Recognizing this helps you avoid the trap of underdeveloped gas pockets, which are essential for a light crumb.
Proper proofing allows the yeast to produce enough carbon dioxide to create a network of tiny bubbles that give bread its lightness. Underproofed dough lacks this structure, resulting in a dense loaf. Overproofing, on the other hand, can cause the gluten to weaken, leading to a collapse. Therefore, understanding the signs of proper proofing is vital for balancing this process.
For example, a typical proofing stage for a standard loaf might be 1 to 2 hours at room temperature. During this time, the dough should roughly double in size, and the surface should look slightly domed. Using a clear container helps you see the rise, and a warm spot accelerates fermentation without risking overproofing. Learning to read these signs ensures your dough has the optimal amount of gas and elasticity for a light, airy loaf.
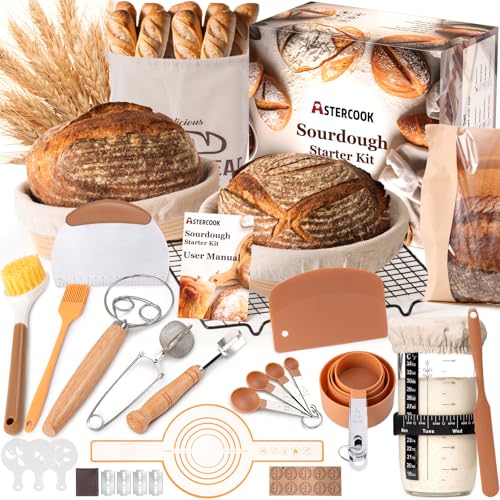
Astercook Sourdough Starter Kit with Round & Oval Banneton Bread Proofing Basket, Starter Jar, Dough Whisk, Scrapers, Stencils, Complete Sourdough Bread Baking Supplies, Fathers Day Gift for Men
- All-in-One Sourdough Kit: Includes baskets, tools, and accessories
- Professional Banneton Baskets: Breathable rattan for even dough rise
- Complete Baking Tools: Whisk, scrapers, lame, and more
As an affiliate, we earn on qualifying purchases.
As an affiliate, we earn on qualifying purchases.
Is Your Yeast Dead? How to Make Sure Your Leaven Is Active
Inactive yeast is a sneaky cause of dense bread. If your yeast isn’t alive and kicking, your dough won’t rise properly, leaving you with a heavy loaf.
Testing your yeast before mixing it into your dough is a simple yet effective way to prevent this issue. Mix a teaspoon of yeast with warm water and a pinch of sugar; if it bubbles vigorously within 5-10 minutes, it’s active and ready to leaven your bread.
This step is especially important if you’re using stored or expired yeast, as yeast viability diminishes over time or with improper storage. Using dead yeast results in little to no gas production, which means your dough won’t develop the necessary volume and structure, leading to dense results.
For example, if you’re using expired yeast or storing it improperly, it might be dead. Keep yeast in the fridge and use within its expiration date for the best results. Fresh, active yeast ensures a vigorous fermentation, which is essential for a light and airy loaf.
When in doubt, buy fresh yeast and proof it before mixing it into your dough to ensure active fermentation. This small step saves you from the disappointment of dense bread and helps you understand how lively your leaven is before committing to the entire batch.
As an affiliate, we earn on qualifying purchases.
Why Your Dough Needs the Right Hydration—And How to Get It Right
Hydration level—the ratio of water to flour—can make or break your loaf’s lightness. Too dry, and your bread feels dense and crumbly. Too wet, and it’s hard to handle, but often lighter when baked properly.
Understanding hydration is key because it directly affects the dough’s extensibility and the development of gluten networks. Higher hydration doughs produce larger, irregular holes and a more open crumb, which is characteristic of artisan breads like ciabatta or sourdough. Conversely, lower hydration results in a tighter, denser crumb, which may be desirable for certain bread types but often leads to a heavier result if not managed carefully.
For example, a typical bread recipe calls for around 60-70% hydration. That means for 500g of flour, you’d use about 300-350g of water. Adjusting hydration impacts not just texture but also the fermentation process, as wetter doughs ferment faster and develop more complex flavors.
If your dough feels stiff and resistant, it’s too dry. You can fix this by gradually adding more water during mixing or adjusting your recipe slightly. Be mindful that increasing hydration can make the dough stickier and more challenging to handle, but it results in a lighter, more aerated crumb.
Remember: higher hydration doughs produce bigger holes and more open crumb—think of a ciabatta or sourdough loaf—while low hydration often yields denser bread. Balancing hydration is a key skill that influences both the texture and the appearance of your finished loaf.
As an affiliate, we earn on qualifying purchases.
Baking Tricks That Help Your Bread Rise and Lighten Up
How you bake influences how airy your bread turns out. Preheating your oven and creating steam are game changers for oven spring—the rapid rise in the first few minutes of baking.
For example, use a baking stone or Dutch oven to trap steam, which keeps the crust soft initially and allows the dough to expand fully. This process helps develop a glossy, crisp crust while maximizing oven spring, which is vital for a light, airy loaf.
Heating your oven to at least 450°F (230°C) and adding steam (like a tray of hot water) during the first 10-15 minutes helps develop a crispy crust and promotes better rise. The steam delays crust formation, giving the dough more time to expand and trapping gases inside, which results in a lighter texture.
Skip this step, and you risk a flat, dense loaf with a tough crust. Simple tools like a cast-iron skillet or a spray bottle can help you create the right environment quickly. Understanding these baking techniques allows you to control the final texture and appearance of your bread, making it more appealing and light.
Compare Common Flours: Which Makes Lighter Bread?
| Flour Type | Protein Content | Impact on Bread |
|---|---|---|
| Bread Flour | 12-14% | Creates strong gluten, light and chewy bread. High protein content allows for better gas retention, leading to a more open crumb and a lighter texture. However, too much gluten development can make the bread tough if overworked. |
| All-Purpose Flour | 9-11% | Good for softer, slightly denser bread. It provides less gluten strength, which might result in a slightly tighter crumb, but it’s versatile and easier to handle for home bakers. |
| Whole Wheat Flour | 13-15% | Heavier, denser unless blended or properly handled. The bran and germ interfere with gluten formation, often resulting in a denser loaf unless combined with white flour or treated with additional hydration and fermentation techniques. |
For lighter bread, bread flour with higher protein content usually produces a better rise and more open crumb. Experimenting with blends can give you the perfect balance between flavor, nutrition, and texture, allowing you to tailor your bread to your preferences and environment.
Frequently Asked Questions
Why is my homemade bread so dense even after baking?
Common causes include underproofing, insufficient gluten development, or low hydration. Making sure your dough has risen enough and is properly kneaded can fix this.How can I tell if my dough is proofed enough?
Use the poke test: gently press your finger into the dough; if it slowly springs back and leaves a slight indentation, it’s ready to bake.What’s the easiest way to make my bread lighter?
Increase hydration, ensure proper proofing, and create steam during baking. These simple steps dramatically improve crumb lightness.Can I fix dense bread after it’s baked?
Unfortunately, once baked, it’s hard to change the density. Prevention—through proper technique—is key. Toasting or slicing thin can help improve texture if needed.What flour should I use for lighter bread?
Bread flour, with higher protein content, generally produces a lighter, more open crumb compared to all-purpose flour.Conclusion
Think of your bread as a living thing. Pay attention to its signals—like how it feels and rises—and give it the proper environment. With simple tweaks, your dense loaves can become light, airy masterpieces that make every slice feel like a celebration.
Next time, focus on proofing, hydration, and oven tricks. Your perfect loaf is just a few mindful steps away—ready to fill your kitchen with that irresistible aroma.