TL;DR
Caramelizing sugar can be stress-free if you control the heat, watch for color cues, and prepare everything in advance. Using a thermometer and visual hints helps prevent burning and panic, making the process smoother and safer.
Use a heavy-bottomed pan and keep heat at medium to prevent hot spots and burning.
Watch for visual cues—light amber is perfect; dark amber or black means overdone.
A thermometer helps stay within safe temperature zones, reducing panic.
Prepare all ingredients before starting to keep calm and act quickly.
Practice in small batches to build confidence and recognize signs of doneness.
How to Caramelize Sugar Without the Panic
Control the heat, read the color, and prepare every tool before the sugar hits the pan. With one temperature target and a few sensory cues, bubbling sugar becomes a calm, repeatable technique.
Your three-part early warning system
Caramel changes quickly, but it does not change silently. Temperature, color, and aroma work together: if all three point toward readiness, it is time to act.
Use the number
A candy or instant-read thermometer reduces guesswork. Near 320°F, stay beside the pan and prepare to remove it from the heat.
Catch light amber
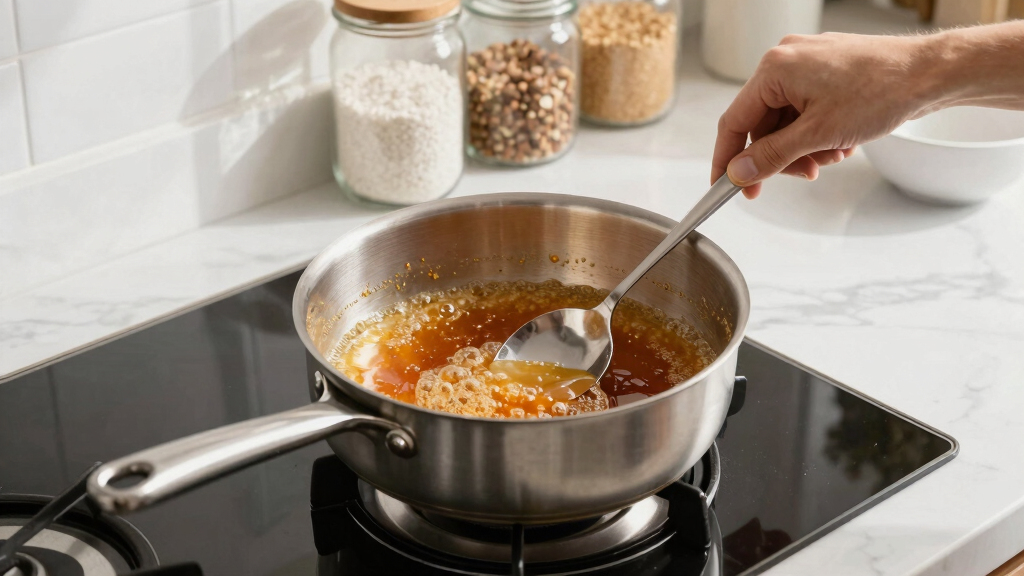
Clear syrup becomes pale gold, then light amber. That golden window delivers balanced sweetness before bitterness begins to dominate.
Notice the nuttiness
A warm, toasted aroma is a readiness cue. A bitter or acrid smell means the sugar has crossed into burnt territory.
Melting
Ideal
High risk
Flavor tradeoff: lighter caramel stays mild and sweet; darker caramel grows more complex but approaches bitterness. Blackened sugar is burnt and cannot be rescued.
Five controlled moves to perfect caramel
Once melting begins, the process accelerates. A prepared workspace lets you respond immediately instead of searching for tools while the sugar keeps cooking.
Gather everything
Set out sugar, heavy pan, thermometer, mitts, and measured add-ins.
Use medium heat
Avoid a high flame. Moderate heat reduces hot spots and sudden scorching.
Let edges melt
Spread sugar evenly and do not stir immediately; gently swirl if needed.
Track three cues
Look for light amber, about 320°F, and a warm toasted aroma.
Remove immediately
Residual heat keeps cooking. Add butter or cream carefully if making sauce.
Where control matters most
Spot trouble before it takes over
Most caramel problems begin with excess heat, premature stirring, moisture, or hesitation. Early recognition gives you time to lower the heat, dissolve crystals, or stop the cooking.
Crystallization
Often caused by stirring too early, stray crystals, moisture, or abrupt temperature changes.
Respond: Add a small splash of water or about a teaspoon of lemon juice, then heat gently to dissolve.
Burnt caramel
Blackened color and a bitter smell indicate irreversible scorching. The flavor cannot be masked or repaired.
Respond: Turn off the heat, allow safe cooling, discard, clean the pan, and restart with fresh sugar.
Uneven heat
A thin pan or high flame creates hot spots, leaving some sugar solid while other areas overcook.
Respond: Use a heavy-bottomed pan, lower to medium heat, and gently swirl instead of aggressively stirring.
| Feature | Classic method | Modern control |
|---|---|---|
| Temperature | Analog dial thermometer | Digital or instant-read thermometer |
| Heat source | Stove with adjustable flame | Induction cooktop with precise settings |
| Utensil | Wooden or metal spatula | Heat-resistant silicone spatula |
| Protection | Basic oven mitts | Heat-resistant gloves and protective gear |
| Best advantage | Simple, familiar, widely available | Faster readings and tighter heat control |
Calm responses to common questions
How do I stop the sugar from scorching?
Keep the heat at medium, stay beside the pan, monitor the color closely, and remove it as soon as light amber appears.
What if the sugar clumps?
Add a small splash of water or lemon juice and heat gently to dissolve the crystals. Avoid vigorous stirring.
Can I rely only on visual cues?
Yes. Watch for clear syrup turning light amber and notice the nutty aroma. Small practice batches sharpen recognition.
Can blackened caramel be saved?
No. Burnt caramel develops an acrid bitterness that cannot be reversed. Cool it safely, discard it, and start fresh.
Use a heavy-bottomed pan, medium heat, and a thermometer when possible. Aim for light amber at roughly 320°F / 160°C, remove the pan immediately, and practice with small batches until the cues feel familiar.
What Exactly Is Caramelization—and Why It Can Feel Tricky
Caramelization is the process of heating sugar until it melts and transforms into a rich, golden-brown syrup. It’s a quick, vibrant change—like catching a sunset in your pan. The tricky part? Sugar can go from perfect to burnt in seconds. An overly high flame or distraction can turn that beautiful amber into bitter black.
Understanding why this matters is key: the color and aroma of caramel directly influence the flavor profile. Light amber offers a mild, sweet taste, while darker caramel develops richer, more complex flavors but also increases the risk of bitterness if overdone. The tradeoff? Patience and precise control can yield nuanced flavors, but rushing or losing focus can ruin your batch. Recognizing these subtle cues helps you decide when to act, ensuring a balanced, flavorful caramel every time.

Digital Candy Thermometer with Pot Clip, 10" Long Stainless Steel Probe, Instant Read Kitchen Thermometer for Cooking, Baking, and Candy Making
- Pot Clip for Safe Handling: Securely attaches to pots for safety
- Clear LCD Temperature Display: Easy-to-read digital screen
- Waterproof and Easy to Clean: IP65 rated, safe under running water
As an affiliate, we earn on qualifying purchases.
As an affiliate, we earn on qualifying purchases.
How to Use Visual Cues and a Thermometer to Stay in Control
To caramelize sugar without panic, you need two things: good visual cues and a reliable thermometer. Start with a clean, heavy-bottomed saucepan. As you heat, watch for the color shift—light amber signals the perfect stage. If it darkens too quickly, you’re close to burning, which can impart a bitter, burnt flavor that ruins the final product. Recognizing these cues prevents overcooking and saves your batch from failure.
For precision, a candy or digital thermometer helps. Aim for around 320°F (160°C). This temperature is critical because it’s the point where sugar reaches a sweet spot: hot enough to develop complex flavors but not so hot that it burns instantly. Once the sugar reaches this temperature and a golden hue appears, remove from heat immediately. This careful timing ensures a smooth, well-flavored caramel, avoiding the bitterness of overcooking.
For example, when making caramel sauce, you’ll see bubbling intensify and smell nutty—these are signs to act fast and prevent over-darkening, which could lead to a bitter taste or burnt texture.
heavy-bottomed saucepan for sugar caramelization
As an affiliate, we earn on qualifying purchases.
As an affiliate, we earn on qualifying purchases.
The Step-by-Step Guide to Perfect Caramel Every Time
- Gather your ingredients: sugar, a heavy-bottomed pan, a thermometer, and optional add-ins like butter or cream. Having everything ready minimizes stress and helps you stay focused.
- Heat the pan over medium—avoid high heat to prevent rapid burning, which can quickly ruin your caramel. Consistent moderate heat allows the sugar to melt evenly, reducing the risk of crystallization or scorching.
- Sprinkle sugar evenly across the bottom—don’t stir immediately. Allow the sugar to melt at the edges first. Gently swirl the pan occasionally to promote even heating without disturbing the melting process, which can cause crystallization.
- Watch for color change—aim for a light amber. This stage indicates the sugar is developing complex flavors without burning. If you see the color darken too quickly, lower the heat or remove the pan from heat temporarily.
- Once the desired color and temperature are reached, remove from heat immediately. Add butter or cream carefully if making a sauce. Doing this swiftly prevents residual heat from continuing to cook the sugar beyond the ideal point, which could cause burning or bitterness.
Practicing this process on small batches builds confidence and helps you recognize signs of doneness without panic. Remember, patience and attentiveness are your best tools for success.

Alpha Grillers Instant Read Meat Thermometer Digital, Cooking, Food, Grill
- Instant Read Response: 2-second temperature readings
- Versatile Use: Suitable for grilling, baking, and more
- Easy-to-Read Display: Bright backlight for visibility in dark
As an affiliate, we earn on qualifying purchases.
As an affiliate, we earn on qualifying purchases.
Common Pitfalls and How to Fix or Prevent Them
Crystallization happens when sugar recrystallizes into lumps, often caused by moisture, rapid temperature changes, or stirring too early. To prevent this, keep your pan dry, avoid stirring until the sugar is mostly melted, and add ingredients like butter or cream gently to avoid shock. If crystals form, adding a splash of lemon juice or water can help dissolve the lumps, but it’s better to prevent crystal formation altogether because it can give your caramel a grainy, unattractive texture that’s hard to fix. Recognizing early signs and maintaining gentle heat helps you avoid these issues.
Burnt caramel is a total loss. If you notice a bitter smell or blackened color, it’s best to discard and start fresh—burned sugar develops a strongly bitter, acrid flavor that’s impossible to salvage. The tradeoff here is clear: rushing the process or ignoring color cues leads to waste. Slow, attentive cooking minimizes this risk, ensuring your caramel turns out smooth and flavorful.
Remember, hot caramel can cause serious burns. Use long-handled tools, wear oven mitts, and work on a stable surface. Understanding the severity of the hot liquid helps you develop safe habits and prevents accidents that could ruin your day or cause injury.

5 Piece Chocolate Dipping Tool Candy Making Supplies for Easy Candy Making and Decorative Plating, Stainless Steel Decorating Spoons for Decorative Plates Cake Coffee, Dipping Fork Spoons
- Distinctive Design: Includes 3 forks and 2 decorating spoons
- Sturdy Stainless Steel: Durable construction with non-slip silicone handles
- Versatile Use: Ideal for chocolates, cake pops, fruits, and more
As an affiliate, we earn on qualifying purchases.
As an affiliate, we earn on qualifying purchases.
Comparison Table: Classic vs. Modern Caramelization Tools
| Feature | Classic Method | Modern Tools |
|---|---|---|
| Thermometer Type | Analog dial | Digital or instant-read |
| Heat Source | Stove with adjustable flame | Induction cooktop for precise control |
| Spatula | Wooden or metal | Silicone heat-resistant spatula |
| Safety Equipment | Basic oven mitts | Heat-resistant gloves and protective gear |
How to Fix Common Mistakes and Keep Calm
If your sugar crystallizes or burns, don’t panic. For crystals, add a teaspoon of lemon juice or water and gently heat to dissolve. If it’s burnt, discard and start fresh—burned caramel can’t be rescued. Remember, the key is to stay calm and focus on small, controlled steps. Recognizing early signs of trouble allows you to adjust heat or ingredients quickly, preventing disasters. Practice patience, and over time, you’ll develop an intuitive sense for when your caramel is just right, making the process more relaxed and enjoyable.
Frequently Asked Questions
How do I prevent my sugar from burning?
Keep the heat at medium, watch closely for color changes, and remove from heat as soon as it reaches the perfect amber hue. Using a thermometer can help maintain consistent temperature and avoid surprises.
What if my sugar crystallizes or clumps?
Add a small splash of water or lemon juice, then gently heat while stirring to dissolve the crystals. This prevents lumps and keeps your caramel smooth and glossy.
Can I caramelize sugar without a thermometer?
Yes, but it requires keen observation: look for a clear to light amber color and a nutty aroma. Practice helps you recognize these cues without relying solely on a device.
What should I do if I burn my caramel?
Unfortunately, burnt caramel can’t be rescued. Discard it safely and start over with fresh sugar. Remember, quick removal from heat prevents this from happening in the first place.
How do I handle hot caramel safely?
Use long-handled tools, wear oven mitts, and work on a stable, heat-resistant surface. Keep a bowl of cold water nearby for emergencies or testing color.