TL;DR
A water bath provides gentle, even heat that prevents cracking during cheesecake baking. Wrapping the pan, using hot water, and cooling slowly are key to success. Recent tech trends improve ease and results.
Always wrap your cheesecake pan in heavy-duty aluminum foil to prevent water seepage.
Use hot water—around 120°F (49°C)—to fill the outer dish for a stable, even baking environment.
Bake at a low temperature (~300°F/150°C) and cool slowly to avoid cracks.
Modern innovations like silicone liners and precise ovens help improve results, but the basics still matter most.
Patience is key—gradual cooling and careful handling make all the difference in a crack-free cheesecake.
Mastering the Water Bath for Crack-Free Cheesecakes
A water bath turns harsh oven heat into a gentle, moist environment. Secure wrapping, hot water, low heat and patient cooling work together to deliver a level surface and a creamy, evenly baked center.
About 49°C when the outer dish is filled.
About 150°C for slow, controlled baking.
Stable heat and slow cooling matter more than expensive equipment.
A gentler oven inside your oven
The bain-marie buffers sudden temperature changes and adds moisture around the pan. That keeps the edges from racing ahead while the center catches up—especially important for rich New York-style and delicate Japanese cheesecakes.
Even heat
Water absorbs and releases heat gradually, reducing hot spots and helping the filling bake at a consistent rate from edge to center.
Supple surface
A humid oven environment slows surface drying. The top remains flexible while the custard sets instead of tightening and splitting.
Creamy center
Lower, steadier heat limits overcooking and graininess, producing a smooth interior with fewer differences between edge and center.
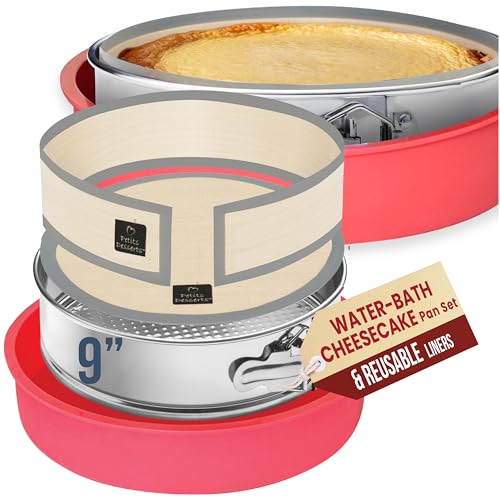
9 Inch Springform Pan for Cheesecake, with LEAKPROOF Silicone Sleeve & 2 REUSABLE Liners for WATER BATH Baking – No Foil Wrap & Parchment Needed, NON-TOXIC Stainless Steel Cheese Cake Pans for Baking
LEAKPROOF WATER BATH PROTECTION – The silicone sleeve helps seal the pan during water bath baking, keeping water…
As an affiliate, we earn on qualifying purchases.
As an affiliate, we earn on qualifying purchases.
Five moves to a flawless finish
Prepare the bath before the cheesecake enters the oven. Once baking begins, resist unnecessary movement, temperature changes and repeated door opening.
Seal the pan
Wrap the base and sides in at least two layers of heavy-duty foil.
Nest the pans
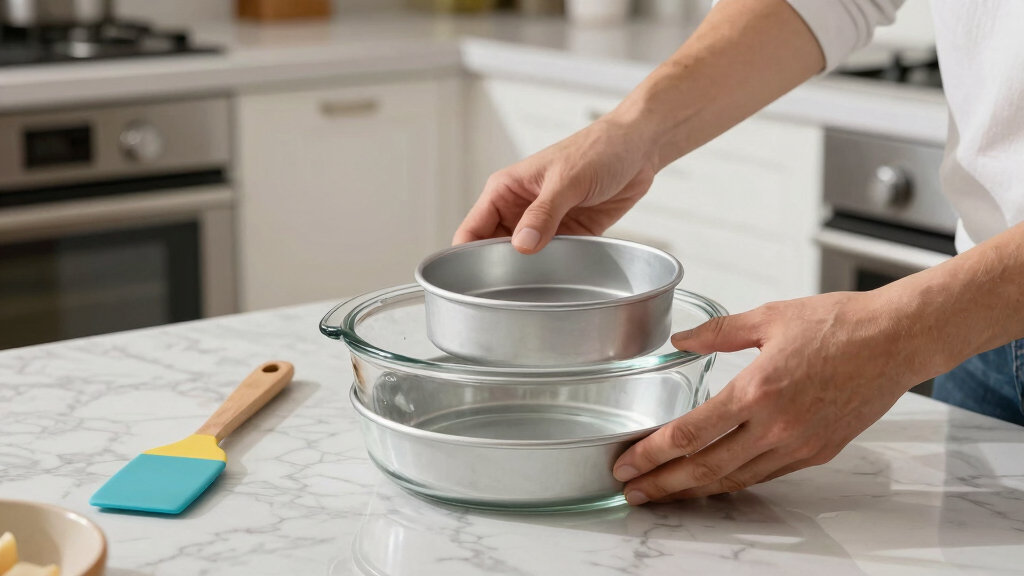
Place the springform pan inside a larger, heat-resistant roasting dish.
Add hot water
Pour in 120°F / 49°C water until it reaches halfway up the inner pan.
Bake low
Use roughly 300°F / 150°C and stop when the center still jiggles slightly.
Cool in stages
Turn off the oven, crack the door, then cool at room temperature and chill.
Set the roasting dish on the oven rack before adding hot water when possible. Pour slowly, keep water away from the batter and use secure oven gloves when removing the heavy bath.

Reynolds Wrap Everyday Strength Aluminum Foil Roll, Freezer Safe and Grill Safe, Great for Foil Packets and Home Cooking, 12 Inches Wide, 200 Total Sq. Ft.
Package Includes: One (1) Reynolds Wrap Everyday Strength Aluminum Foil Roll measuring 200 feet long by 12 inches…
As an affiliate, we earn on qualifying purchases.
As an affiliate, we earn on qualifying purchases.
The numbers that matter
These tracks show the practical setup points—not a race to maximum heat. The goal is a stable thermal environment, a protected pan and enough time for the custard structure to settle.
9 Inch Springform Pan for Cheesecake, with LEAKPROOF Silicone Sleeve & 2 REUSABLE Liners for WATER BATH Baking – No Foil Wrap & Parchment Needed, NON-TOXIC Stainless Steel Cheese Cake Pans for Baking
LEAKPROOF WATER BATH PROTECTION – The silicone sleeve helps seal the pan during water bath baking, keeping water…
As an affiliate, we earn on qualifying purchases.
As an affiliate, we earn on qualifying purchases.
Choose your level of control
The classic wrapped-pan bath remains the most accessible route. Newer tools mainly solve two practical problems: water ingress and inconsistent temperature.
| Method | Heat stability | Leak protection | Complexity | Best use |
|---|---|---|---|---|
| Direct bake | ~Lower | ✓No bath contact | Low | Firm recipes with lower crack sensitivity |
| Classic water bath | ✓Strong | ~Depends on foil | Moderate | Most rich, delicate cheesecakes |
| Waterproof bag bath | ✓Strong | ✓Enhanced barrier | Moderate | Springform pans prone to seepage |
| Precision sous-vide | ✓Very precise | ✓Sealed vessel | High | Experimental formats and maximum control |
oven-safe silicone cheesecake mold
As an affiliate, we earn on qualifying purchases.
As an affiliate, we earn on qualifying purchases.
Five crack makers—and their fixes
A bath cannot compensate for every error. Most failures still trace back to excess baking, thermal shock, poor sealing, incorrect water or handling before the cheesecake has fully set.
Overbaking
Stop when the edges are set and the center moves softly. A rigid center is likely already overdone.
Thermal shock
Cool first in the switched-off oven, then at room temperature before refrigeration.
Cold bath water
Begin near 120°F / 49°C so the oven does not spend the early bake reheating the bath.
Leaking foil
Use wide, heavy-duty foil without seams below the waterline and inspect it for tears.
Early release
Chill for at least four hours before unmolding; overnight delivers the most dependable set.
Modern upgrades, classic fundamentals
Recent tools can make removal, sealing and temperature management easier. They improve repeatability, but none replaces careful preparation and gradual cooling.
Silicone liners
Reduce sticking and surface stress during removal. Parchment at the base offers a simple alternative.
Waterproof bags
Add a purpose-built barrier around the pan, helping prevent a soggy crust when foil feels unreliable.
Modern ovens
Convection, infrared sensing and tighter thermostatic control can reduce hot spots and temperature swings.
Sous-vide setups
Offer tightly controlled heat and moisture, though they require specialized equipment and recipe adaptation.
Blocks water ingress and protects the crust.
Buffers heat and surrounds the pan evenly.
Preserves moisture and creamy texture.
Limits contraction and protects the surface.
Why did it crack despite the bath?
Check for overbaking, rapid cooling and a leaking wrap. The bath helps, but the full temperature-and-moisture chain must remain controlled.
Can the water bath be skipped?
Yes, but uneven baking and cracking become more likely—especially with dense, high-fat or delicate recipes.
How do I stop water seepage?
Use two broad sheets of heavy-duty foil, keep joins above the waterline and consider a waterproof baking bag.
How long should it cool?
Cool gradually in the oven with the door slightly open, continue at room temperature, then refrigerate for at least four hours.
Seal. Bathe. Bake low. Cool slow.
The perfect cheesecake is an exercise in restraint. Protect the pan, introduce hot water, remove the cake while its center still moves, and give it time to settle. Technology can refine the process; patience remains the ingredient that makes it work.
Why a Water Bath Is Your Cheesecake’s Best Friend
The water bath, or bain-marie, acts like a gentle oven inside your oven. It provides uniform, moist heat that keeps your cheesecake from overheating and cracking. Think of it like a cozy blanket that prevents sudden temperature spikes. For instance, a baker once told me she used to get cracks every time she baked at high heat. Now, with a water bath, her cheesecakes are silky smooth and crack-free every single time.
Using a water bath is especially crucial for delicate, high-fat cheesecakes such as New York-style or Japanese cheesecakes. These types are more prone to cracks because of their rich, dense texture. The water bath helps maintain a steady temperature, giving your cheesecake that perfect, creamy consistency without surface flaws.
Beyond preventing cracks, a water bath also helps in achieving a uniform bake. Without it, the edges of the cheesecake tend to overcook while the center remains underdone. The gentle heat distribution ensures that every bite is consistently smooth and creamy. This technique is especially important for recipes that require a delicate balance—any rapid temperature change can cause the batter to contract unevenly, leading to cracks or a grainy texture. The tradeoff, however, is that setting up a water bath requires extra preparation time and careful handling to prevent leaks and water seeping into the batter. Mastering this balance is what separates amateur baking from professional results.
Step-by-Step: How to Prepare Your Water Bath Correctly
- Wrap your cheesecake pan with at least two layers of aluminum foil, making sure it’s leak-proof. This prevents water from seeping into your batter, which can ruin the texture.
- Place the wrapped pan inside a larger roasting or baking dish. Fill the outer dish with hot water—about halfway up the sides of your cheesecake pan.
- Use hot water instead of cold or room temperature. Hot water (~120°F or 49°C) minimizes temperature fluctuations during baking.
- Bake at a lower temperature—around 300°F (150°C)—to give the water bath enough time to do its job without overcooking the edges of your cheesecake.
- Once baked, turn off the oven and let the cheesecake cool gradually, keeping the water bath inside. This slow cooling prevents cracks caused by rapid temperature changes.
It’s important to note that using hot water isn’t just about convenience—it’s about controlling the thermal environment of your cheesecake. Cold water can cause sudden temperature shocks, leading to cracks or uneven baking. Conversely, hot water ensures a gentle, steady heat transfer, mimicking a professional steam-baking environment. The tradeoff is that handling hot water requires caution to avoid burns, and maintaining the water temperature during baking can be tricky. Some bakers use preheated water and keep the water level consistent throughout baking, but the key takeaway is that temperature stability is crucial for crack prevention and uniformity.
Why Wrapping Your Pan Matters More Than You Think
Many bakers underestimate the importance of proper wrapping. Aluminum foil acts as a barrier, sealing out water and preventing leaks that can soggy up your crust or batter. A common mistake is using flimsy foil that tears or doesn’t cover the bottom well. A good practice is to double-wrap with heavy-duty foil, especially if your pan has seams or thin spots.
Imagine baking a cheesecake with water seeping in—your creamy filling becomes watery, and cracks are more likely to form. Proper wrapping ensures your water bath stays water-tight, delivering consistent, gentle heat without surprises. The significance of this step lies in the fact that even minor leaks can introduce unwanted moisture, which affects the texture and appearance of your cheesecake. Properly sealed, the foil not only prevents leaks but also helps distribute heat evenly around the pan, reducing the risk of hot spots that can cause cracks. The tradeoff is that over-wrapping or using improper foil can make it harder to remove the cheesecake cleanly, so a balance of secure wrapping and ease of removal is essential.
Recent Trends That Make Water Bath Baking Easier and Better
Innovations in baking gear are quietly transforming how we approach the water bath. Silicone liners or parchment paper at the bottom of the pan help with quick removal and reduce stress on the delicate surface. Some bakers now use waterproof baking bags, which are double-layered and designed to prevent any water contact.
Modern ovens with precise temperature controls, like convection or infrared models, distribute heat evenly, making water bath baking more reliable. A few adventurous bakers experiment with sous-vide setups—placing the cheesecake in a water-filled, temperature-controlled bath for ultra-smooth results. These methods are not necessary but can elevate your baking experience and results.
Understanding these tech trends is important because they address common issues—like water seeping in or uneven heat distribution—that can compromise your cheesecake’s texture and appearance. Silicone liners, for example, make removing the cheesecake easier and help preserve its delicate surface. Precise temperature controls reduce the guesswork and variability, leading to more consistent results. Sous-vide methods, while more complex, allow for unparalleled control over temperature and moisture, ensuring a perfectly smooth and crack-free cheesecake. The tradeoff with these innovations is that they often require investment in new equipment and a learning curve, but for serious bakers, they can significantly improve outcomes.
The Top 5 Mistakes That Cause Cracks and How to Fix Them
| Common Mistake | Solution |
|---|---|
| Overbaking | Remove the cheesecake when edges are set but center jiggles slightly. Overbaking causes the filling to contract as it cools, leading to cracks. Timing is crucial; underbaking slightly ensures a moist, tender interior that firms up during cooling, reducing stress on the surface. |
| Sudden temperature changes | Cool gradually in the oven, then at room temp before refrigerating. Rapid cooling causes the cheesecake to contract quickly, pulling away from the edges and cracking. Slow, staged cooling allows the structure to set gently, maintaining a smooth surface. |
| Inadequate wrapping | Double-wrap with heavy-duty aluminum foil. Insufficient wrapping allows water to seep into the crust or batter, weakening the structure and increasing crack risk. Proper sealing creates a controlled environment, ensuring even heat and moisture distribution. |
| Using cold water | Always start with hot water to prevent shock. Cold water can cause uneven temperature changes, leading to cracks or uneven baking. Hot water helps maintain a stable thermal environment, crucial for crack prevention. |
| Rapid cooling | Let the cheesecake cool slowly, avoiding drafts or cold surfaces. Rapid cooling causes uneven contraction and stress, resulting in cracks. Gradual cooling allows the structure to set properly, preserving a smooth top surface. |
Your FAQs About Water Bath Cheesecake Baking
Q: Why did my cheesecake crack even with a water bath? Likely reasons include overbaking, uneven wrapping, or sudden cooling. Cracks often result from thermal stress or uneven contraction as the cheesecake cools. Ensuring gentle, gradual temperature changes, proper wrapping, and careful timing can help maintain a smooth surface. Understanding the physics of heat transfer—how rapid shifts cause the batter to pull apart—is key to troubleshooting and refining your technique.
Q: Can I skip the water bath? It’s possible, but the risk of cracks and uneven baking increases—especially for delicate recipes. If you choose to skip, lower the oven temperature and bake more slowly, but be aware that achieving a crack-free surface becomes more challenging. The water bath acts as a thermal buffer, reducing the likelihood of surface tension issues that cause cracks.
Q: How do I prevent water from seeping in? Double-wrap your pan with heavy-duty foil and check for tears before baking. Ensuring a secure seal is crucial because even small leaks can introduce excess moisture, leading to soggy crusts or cracks. The tradeoff is that over-wrapping can make it harder to remove the cheesecake, so aim for a tight but manageable seal.
Q: What’s the best temperature for baking in a water bath? Generally around 300°F (150°C). Adjust based on your specific recipe and oven performance. Maintaining a consistent, moderate temperature allows the water bath to gently cook the cheesecake without causing rapid expansion or contraction, which can lead to cracks.
Q: How long should I cool my cheesecake after baking? Cool in the oven with the door slightly open for about an hour, then refrigerate at least 4 hours or overnight for best results. This slow cooling process minimizes thermal shock, allowing the structure to set evenly and preventing surface cracks caused by sudden temperature changes.